InventoryFeatures in Tally ERP 9
Inventory features in Tally consists configurations / functions related to inventory transactions and reports.
Inventory features in tally are furthered sub-divided into 7 functions, such as
- General
- Storage and Classification
- Order processing
- Invoicing
- Purchase Management
- Sales Management
- Other features
How to start inventory features in Tally ERP 9
- Path: Tally Main –> Gateway of Tally –> F11: Features –> Company Features –> Inventory Features or click on F2: Inventory.
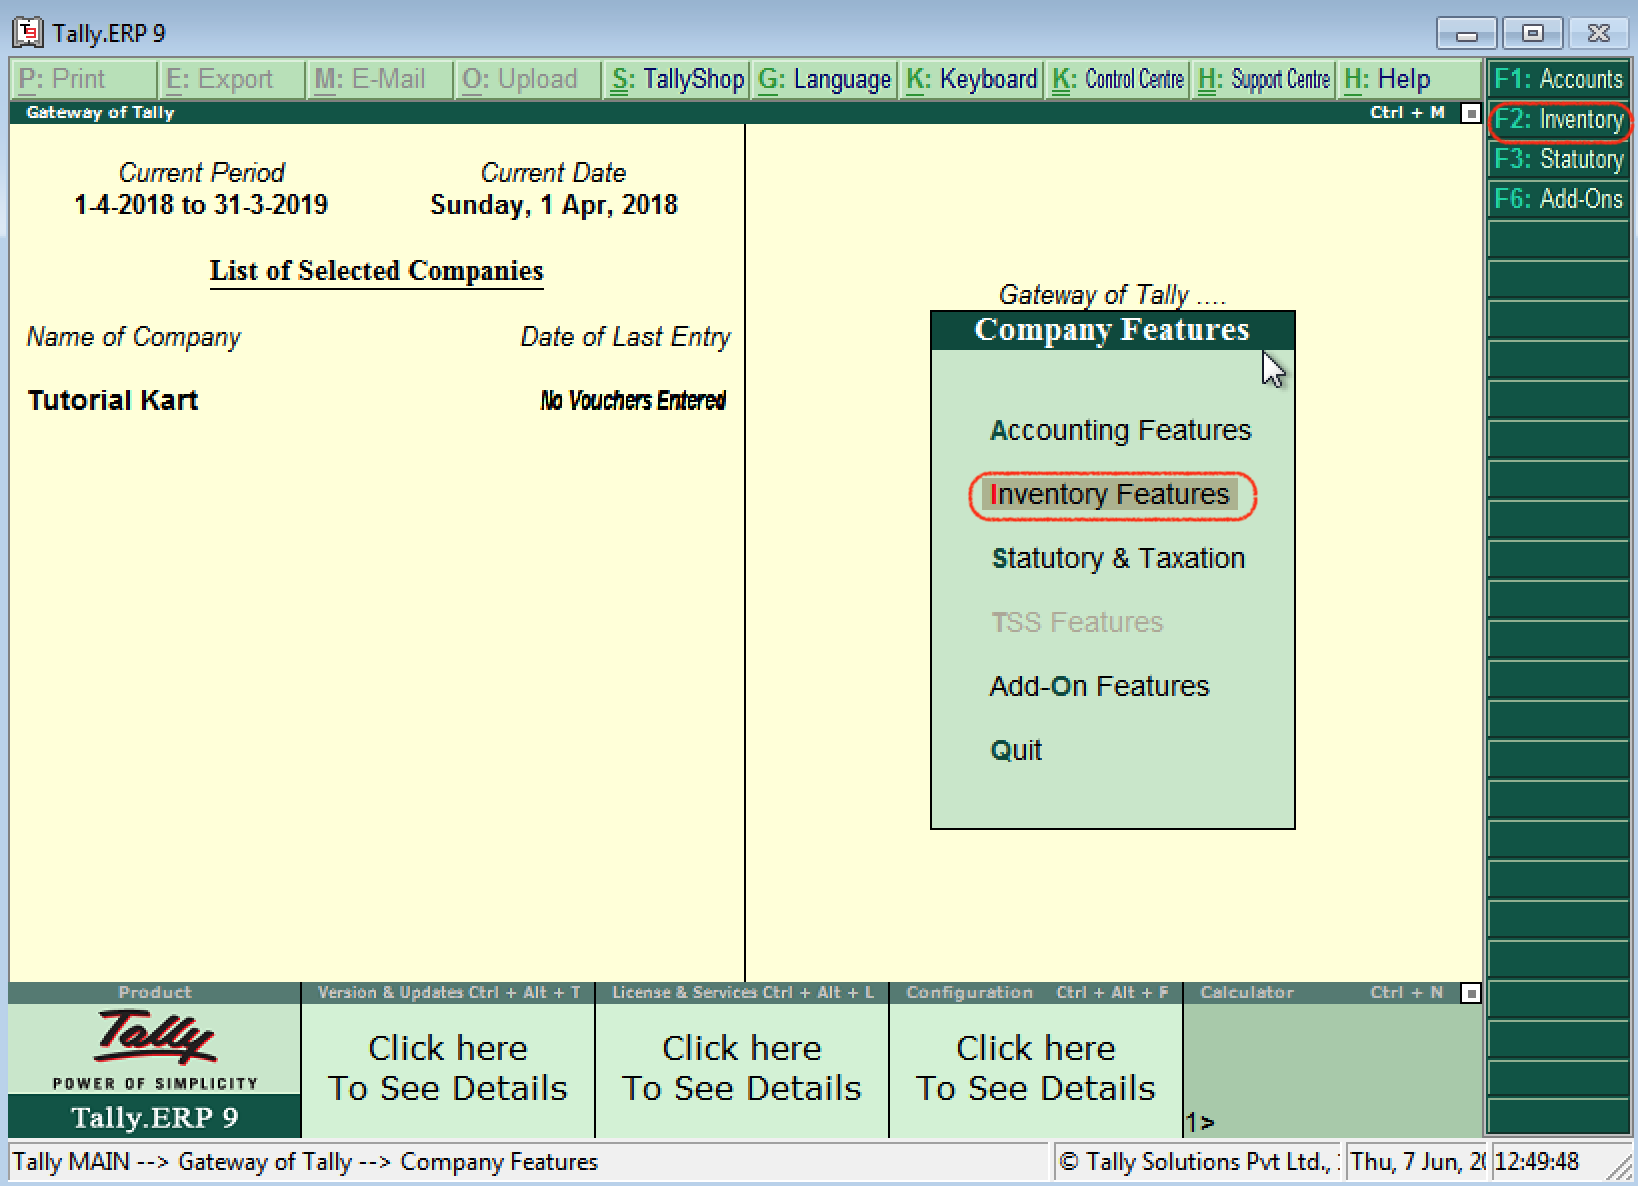
How to enable inventory features in Tally ERP 9
By using inventory features, you enable or disable the options for day to day business transactions. The following screen displays after executing the inventory features.
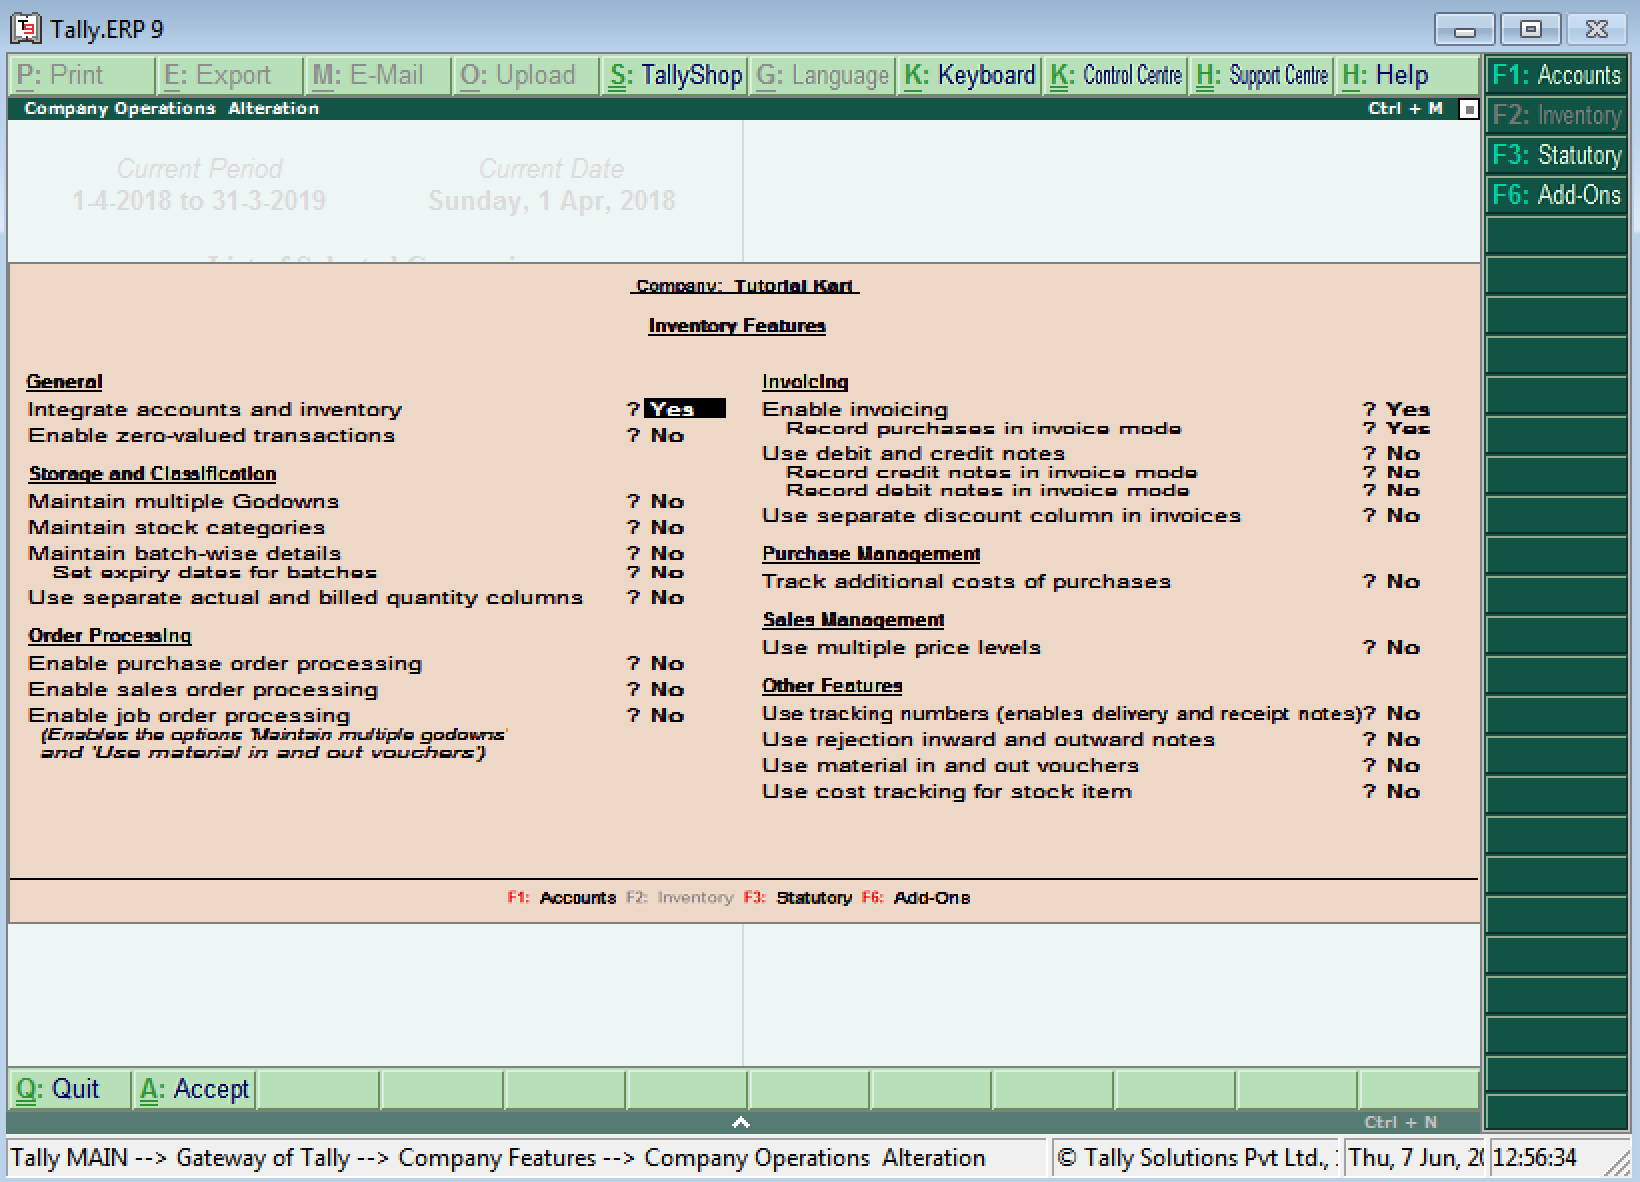
On the company alteration screen, update the following details
General
- Integrate accounts and inventory: Choose this option as Yes to include stock or inventory balances in inventory records.
- Enable zero-value transactions: Choose this option as Yes to allow the zero-value transactions.
Storage and classification
- Maintain multiple godowns: Enable this option if you have more than one storage location and godowns for storing the materials.
- Maintain stock categories: Enable this to define or maintain stock categories
- Maintain batch-wise details: Enable this option to maintain batch-wise details for stock items
- Set expiry dates for batches: Enable this option for maintaining expiration dates for batches
- Use separate actual and billed quantity columns
Order Processing
- Enable purchase order processing: Enable this option to define purchase orders
- Enable sales order processing: Enable this option to define sales orders
- Enable job order processing: Enable this option to define job orders.
Invoicing
- Enable Invoicing:
- Record purchases in invoice mode
- Use debit and credit notes
- Record credit notes in invoice mode
- Record debit notes in invoice mode
- Use a separate discount column in invoices
Purchase Management
- Track additional costs of purchases
Sales management
- Use multiple price levels
Other Features
- Use tracking numbers (enables delivery and receipt notes)
- Use rejection inward and outward notes
- Use material in and out vouchers
- Use cost tracking for stock item
After enabling or disabled the features, choose A: Accept or press ctrl+ A to save the details.
Statutory & Taxation in Tally (F3: Statutory)
The statutory & taxation company features consists configuration and functions related to statutory compliance for company in Tally ERP 9. The statutory features are related to country specific and depends upon country during the company creation in Tally.ERP 9.
The following are the features that are available for statutory and taxation
- Goods and Service Tax (GST)
- Excise
- Value Added Tax (VAT)
- Tax deducted at Source (TDS)
- Tax collected at source
How to enable Statutory & Taxation Features
You can use Statutory and Taxation features in Tally by enabling and disabling options in the company alteration screen.
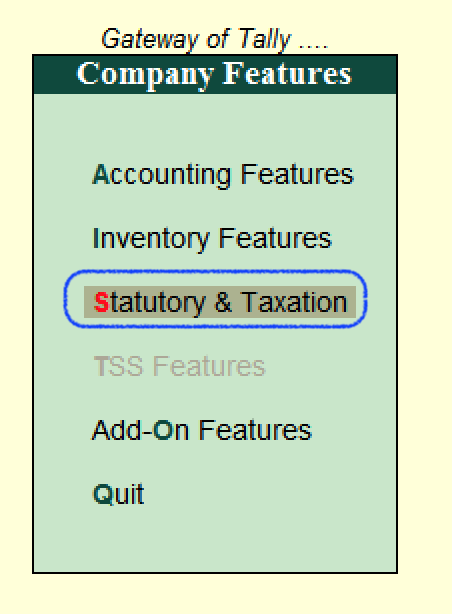
Follow the path and open statutory and taxation.
Gateway of Tally –> F11: Features –> Company Features –> Statutory Taxation or press function key F3
From the screen company operation alteration – Company: Tutorial Kart, update the following details.
- Enable Goods and Services Tax (GST): Enable GST option to use GST tax for company
- Set/alter GST details: Enable this option to change the GST details.
- Enable Value Added Tax (Vat): Country India is now following GST tax, so disable this option as company is following GST tax.
- Set/Alter VAT details: Choose this options as No
- Enable Excise: Enable this option to use the Excise
- Set/alter excise details: Enable this option to change the excise details
- Enable Service Tax: Enable this option to use the service tax by company
- Set/alter service tax details: Enable this option only to alter the service tax details
- Enable Tax deduction at Source: Enable this option to use TDS
- Set/alter TDS details
- Enable Tax collected at Source: Enable this option to use TCS
- Set/alter TCS details
Tax Information:
- PAN/Income Tax No: Update the company permanent account number (PAN) / Income tax number in this field.
- Corporate Identify No: Update the company CIN number in this field.
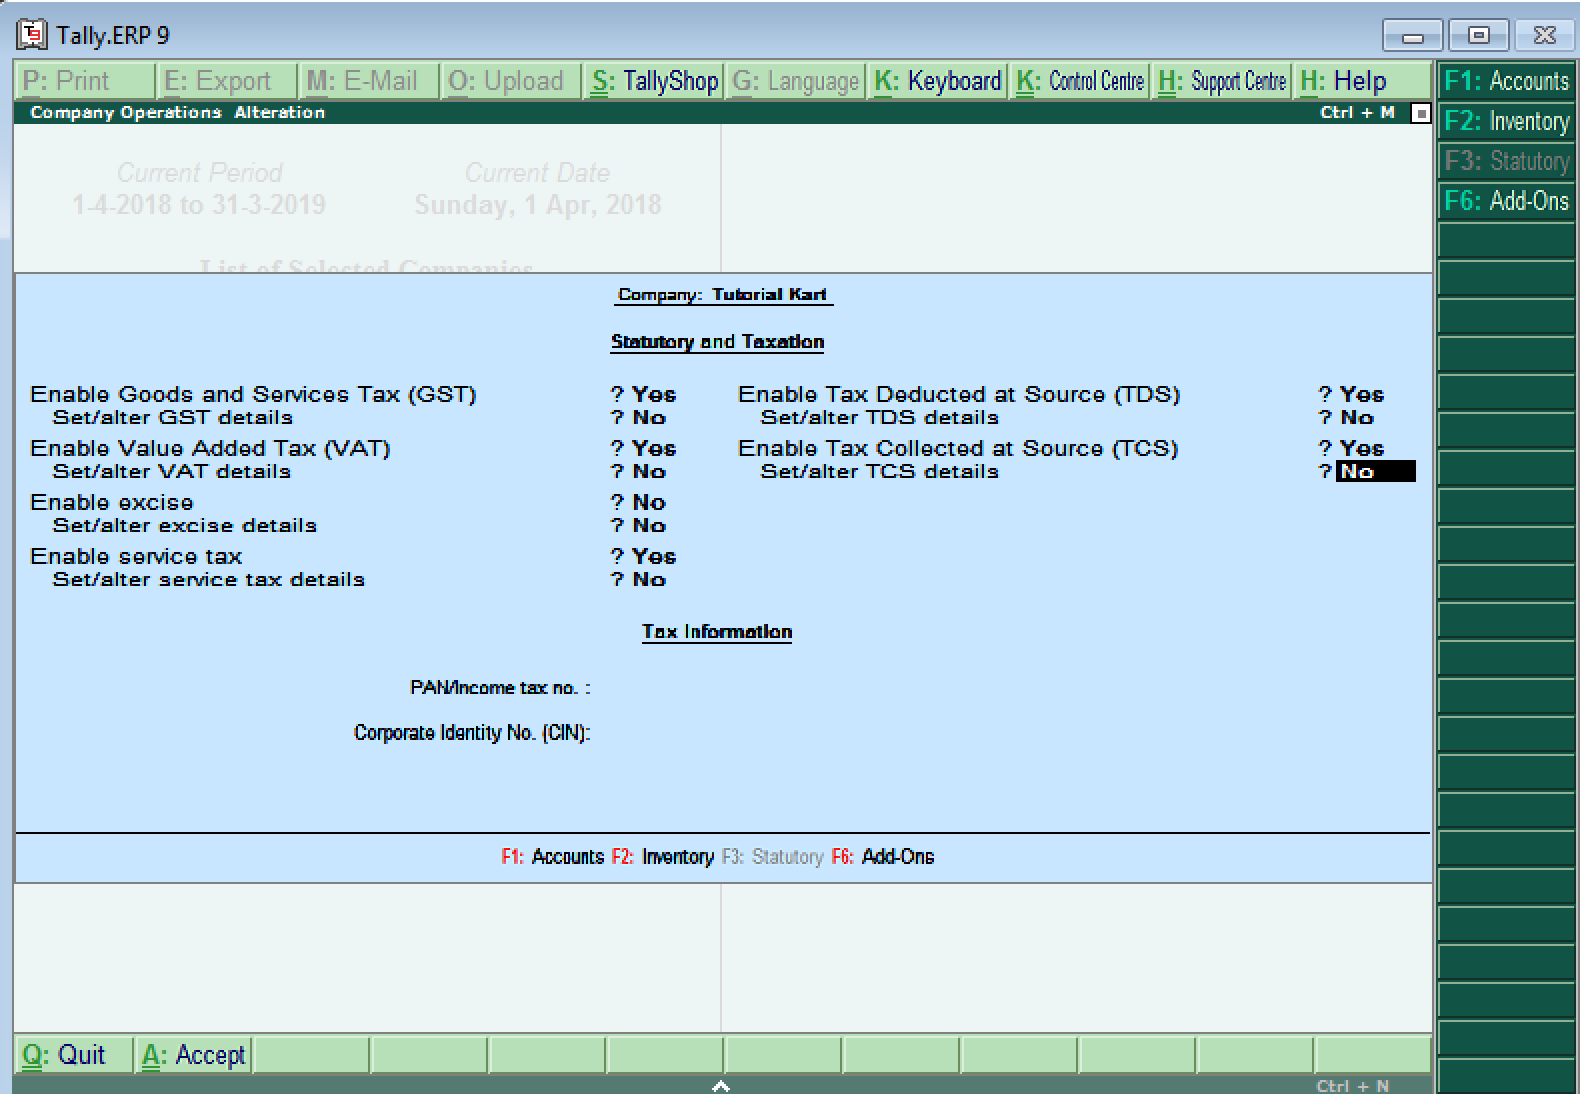
After updating all the required details for statutory and taxation, choose A: Accept to save the details.
How to Create Company in Tally – Setting up of Company in Tally ERP 9
In this Tally ERP 9 tutorial, you will learn how to create company in Tally step by step simple methods. The first step to get started in Tally ERP 9 is to create a company. The creation of company in Tally involves basic information about company, books and currency details.
How to create company in Tally ERP 9
Step 1: After login to Tally, double click on the option create company under company information. To create company in Tally, follow the following navigation path Gateway of Tally > Company Info > Create company
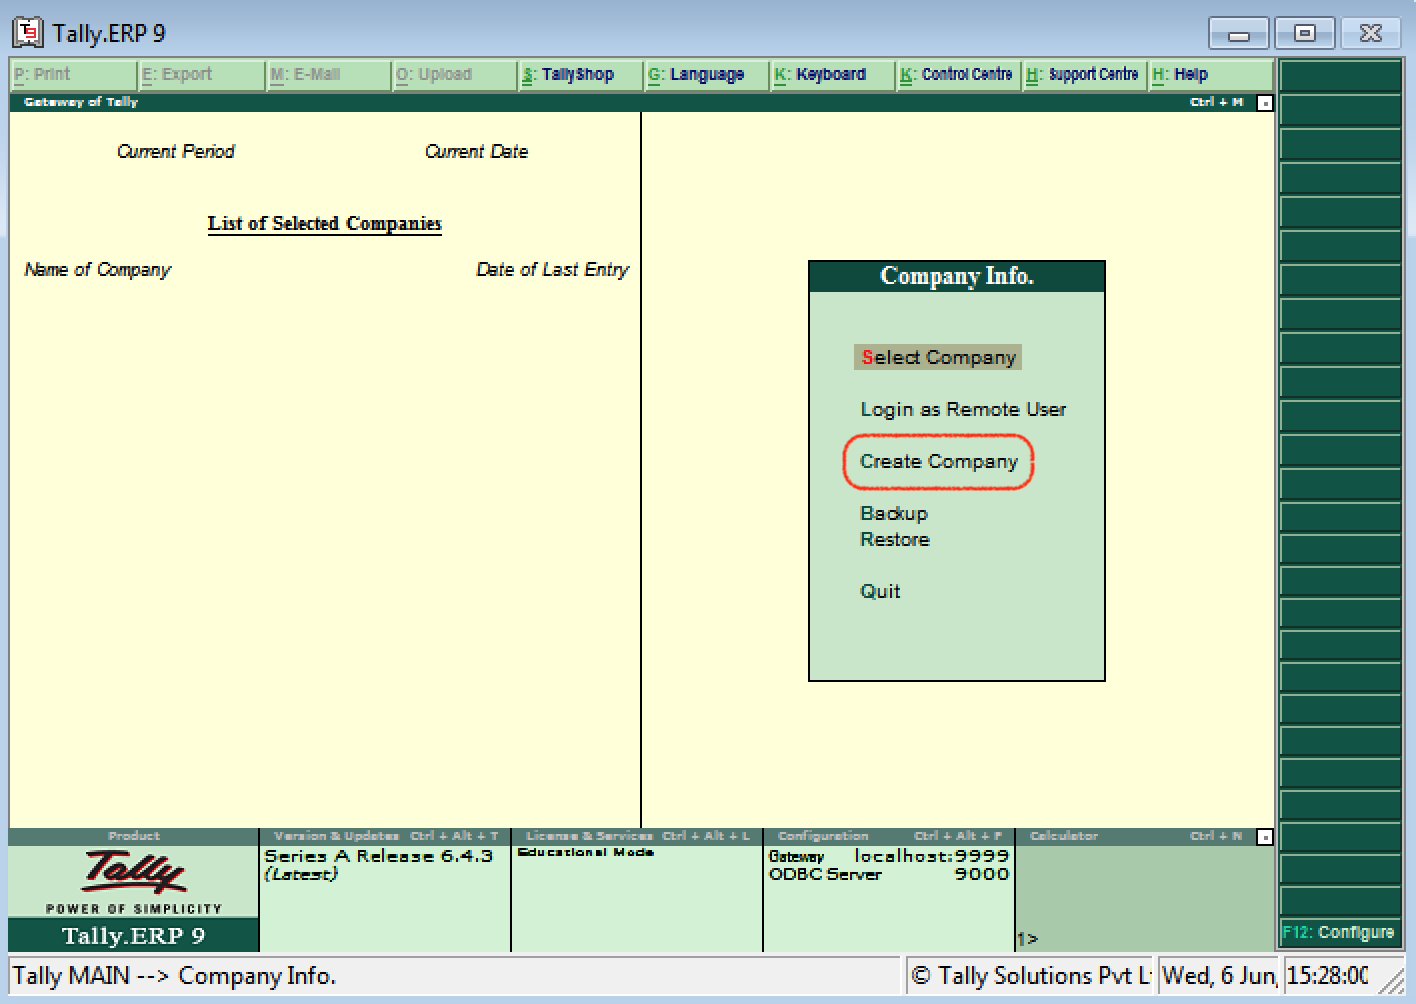
Step 2: The company creation window displays on the screen as show below image
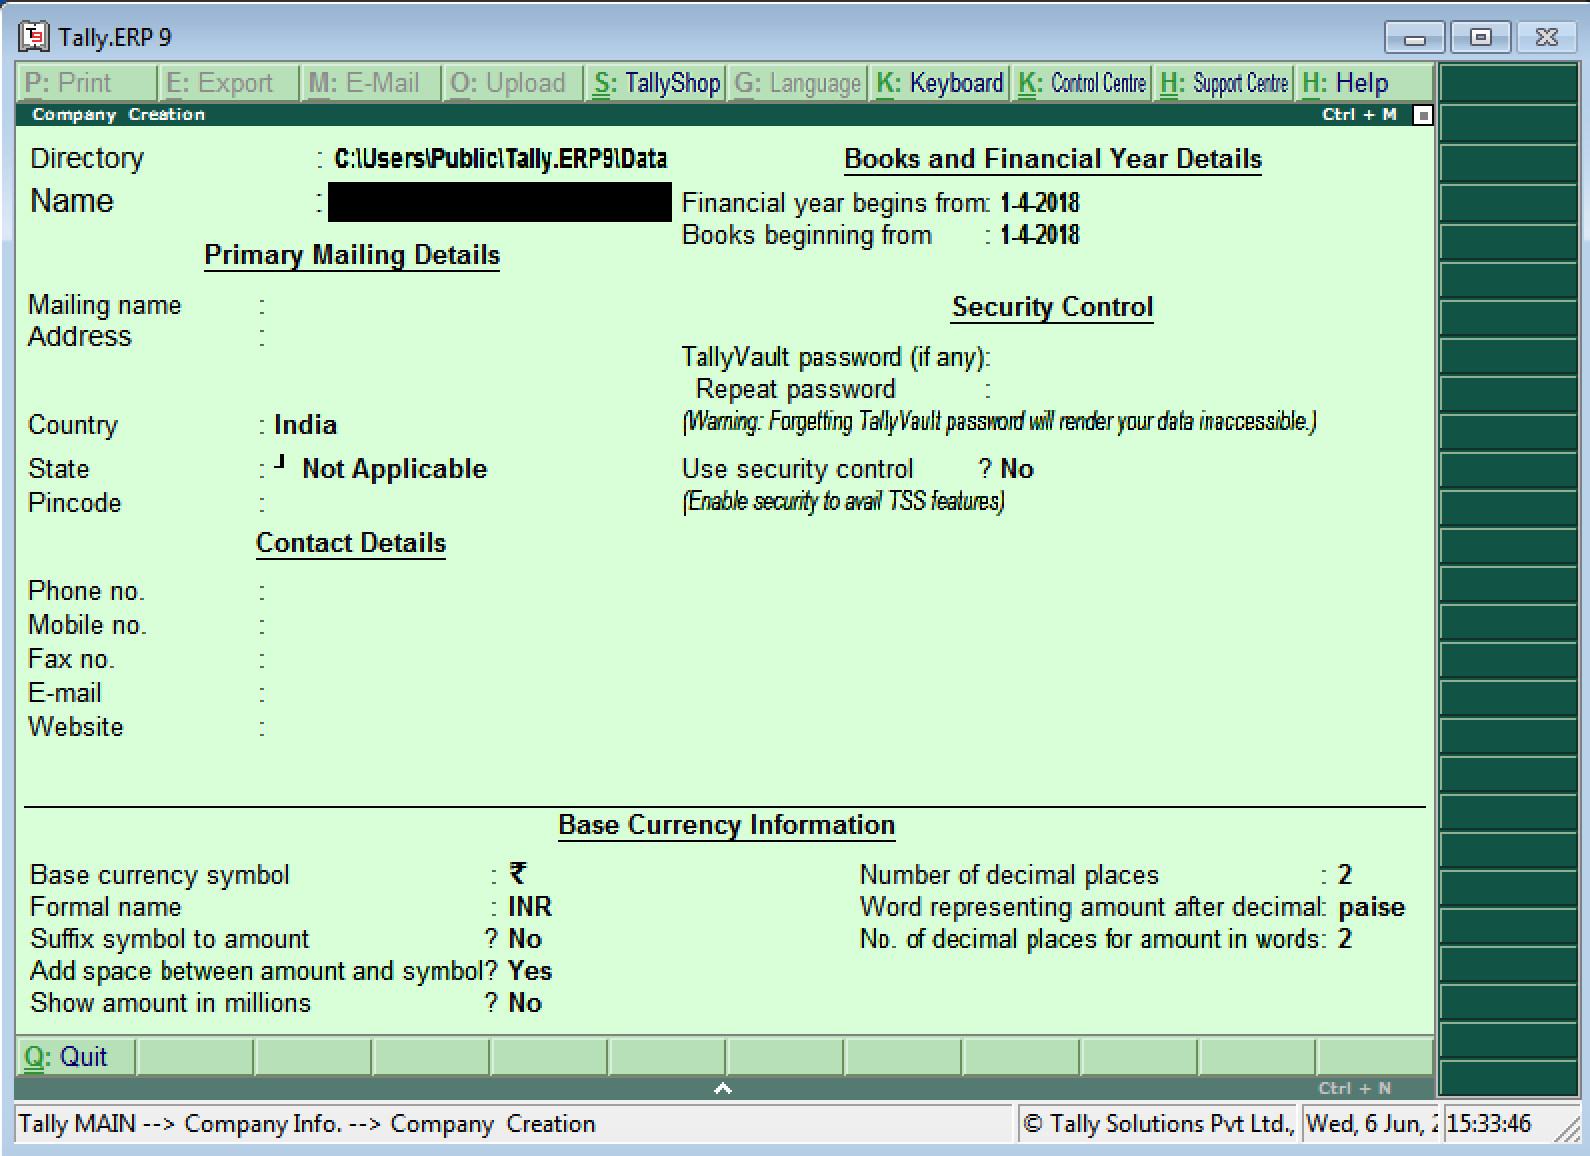
Note: Use the enter key or Tab key or Arrow key or Mouse to navigation between the fields in Tally.
Step 3: On company creation screen, update the following details
- Directory: It is a path where the company date will be stored on system. By default, the tally directory will updated as C:\Users\Public\Tally.ERP9\Data and you can change the path as per your requirements.
- Name: Update the name of company that identifies in Tally ERP 9.
Primary Mailing Details
- Mailing Name:The mailing name of company will be automatically updated as per the given name of company, however the mailing name can be changed as per the requirements.
- Address: Update the complete address details of company
- Statutory Compliance for: Choose the country name as India from the given list of countries.
- State: Choose the state from the given list of states.
- Pin Code: Update the Pin Code of company, where it is located.
Contact Details
- Telephone No: Update Company landline/ Telephone number
- E-Mail: Update the company e-mail id
- Mobile No: Mobile number for contacting
- Fax no: Update the Fax number
- Website: Update the official website address of company
Books and Financial Year Details
- Financial Year From: Update the financial year starting date, all Indian companies financial year start from 1st April and ends on 31st March. Tally considers the 12 months from the date given for financial year. The financial year will be automatically displayed on Tally system, if FY starts in middle of year, you can specify the exact date from here.
- Books Beginning from: Specify the books beginning date.
Security Control
- Tally Vault Password: By enabling Tally vault password, the company data is secured in an encrypted form. The data is not accessible without the password, if you lost the password that will be not recovered.
- Use Security Control: Enabling securing control helps only authorized users are allowed to enter/edit/delete the vouchers on Tally.
Base Currency Information
- Base Currency Symbol: [icon name=”inr” class=”” unprefixed_class=””]
- Formal Name: INR (India Rupees
- Suffix Symbol to Amount: No
- Add spaces between the amount and symbol: Yes
- Show amount in Millions: Yes
- Number of decimal Places: 2
- Word representing amount after decimal: Paisa
- No of decimal places for amount in words: 2
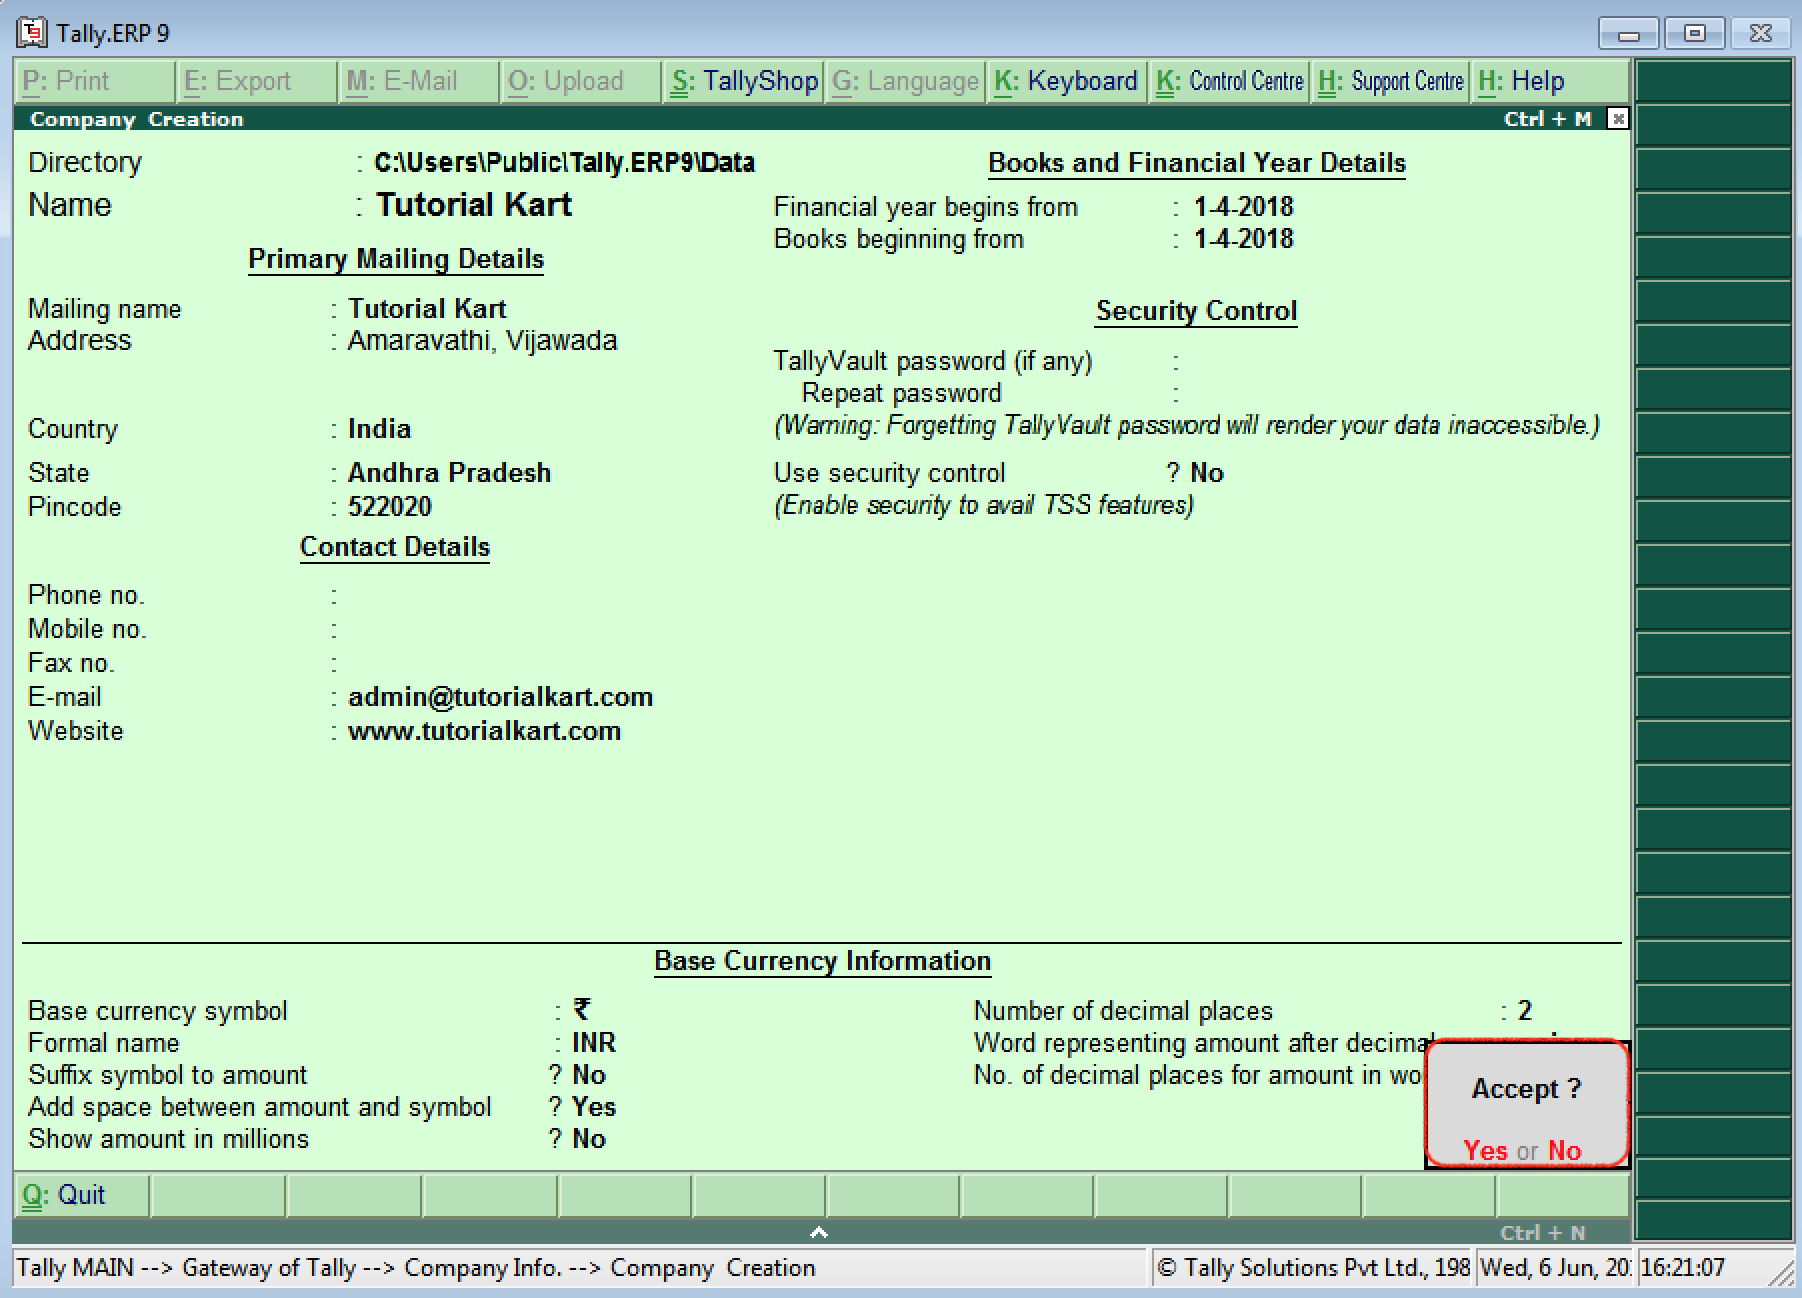
After updating all the required details of company, choose Yes to save the entered details in Tally.
How to Alter/ Delete / Shut Company in Tally
In this Tally ERP 9 tutorials, you will learn how to alter company, delate company and shut company in Tally software.
How to Alter Company in Tally
After creation of company in tally, the given company information can be alter/ modify/ change as per requirements.
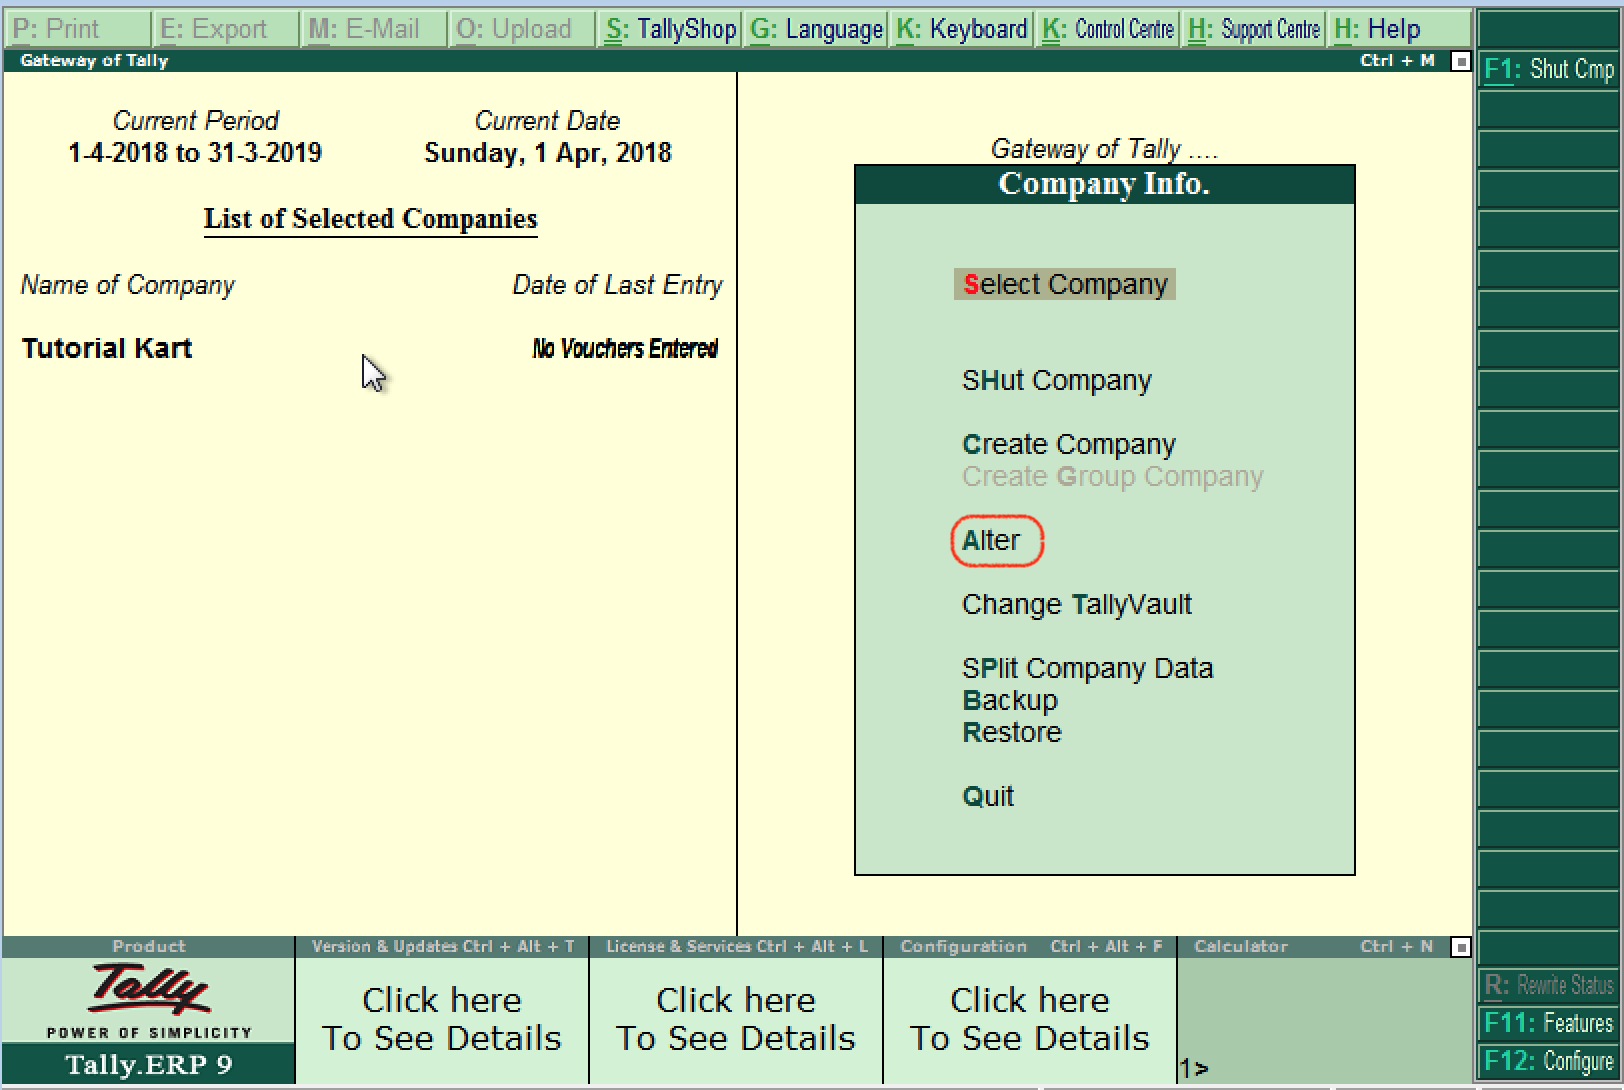
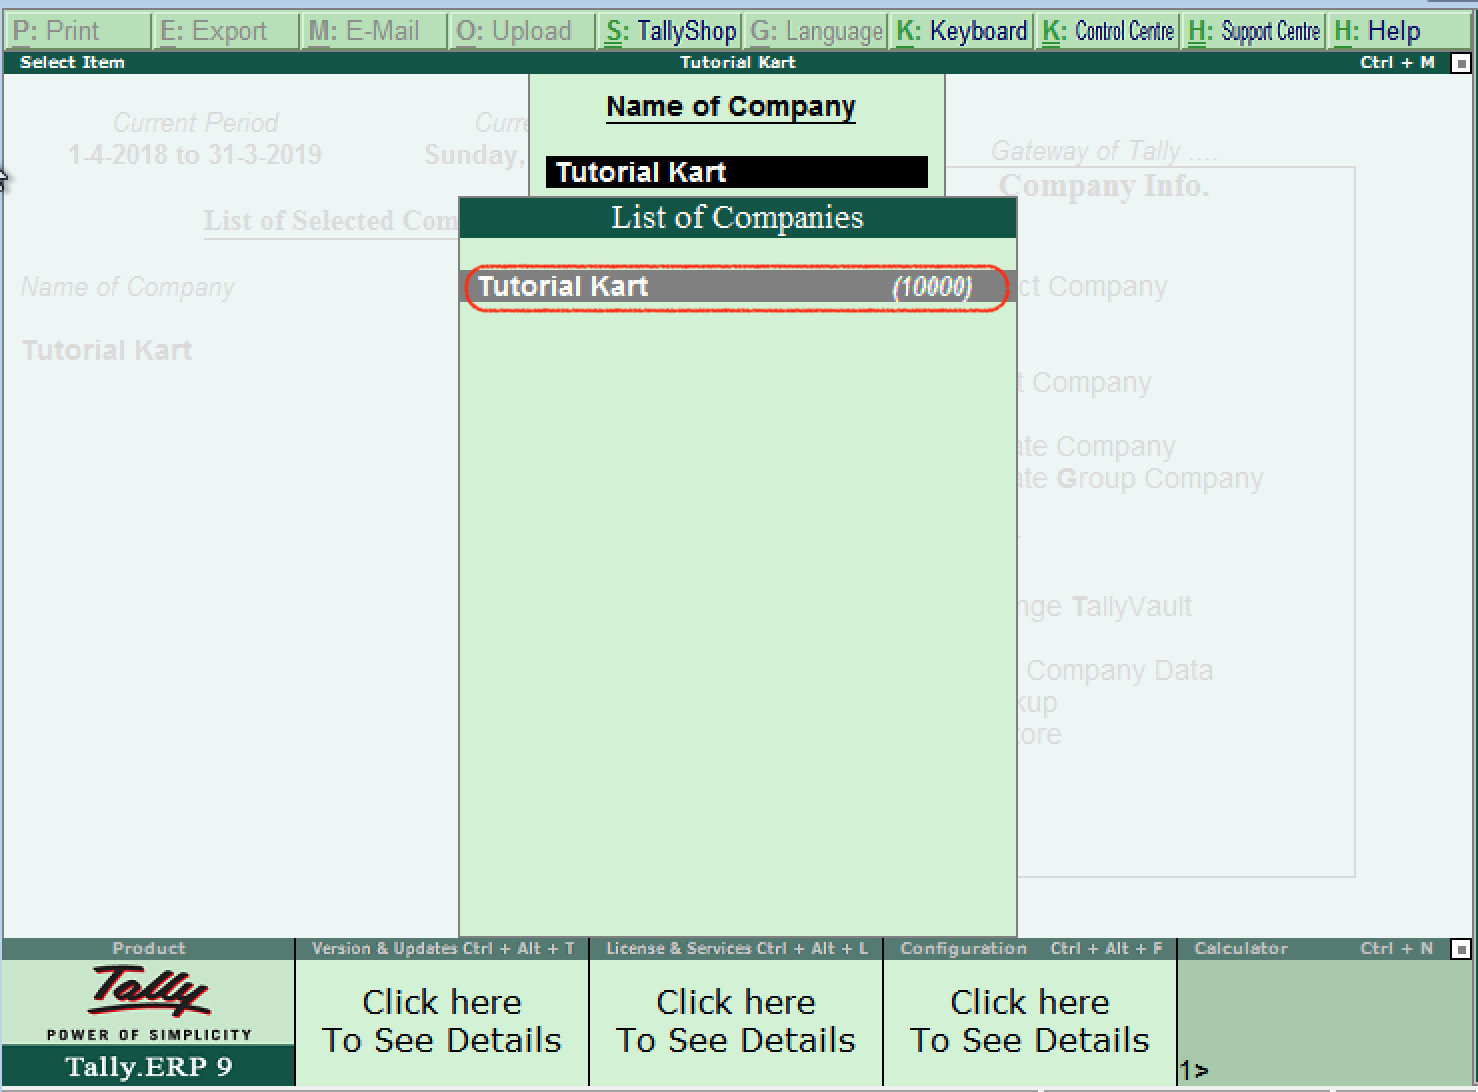
Step 2: Under list of companies, choose the company name (Tutorial Kart) and click on name of company to alter.
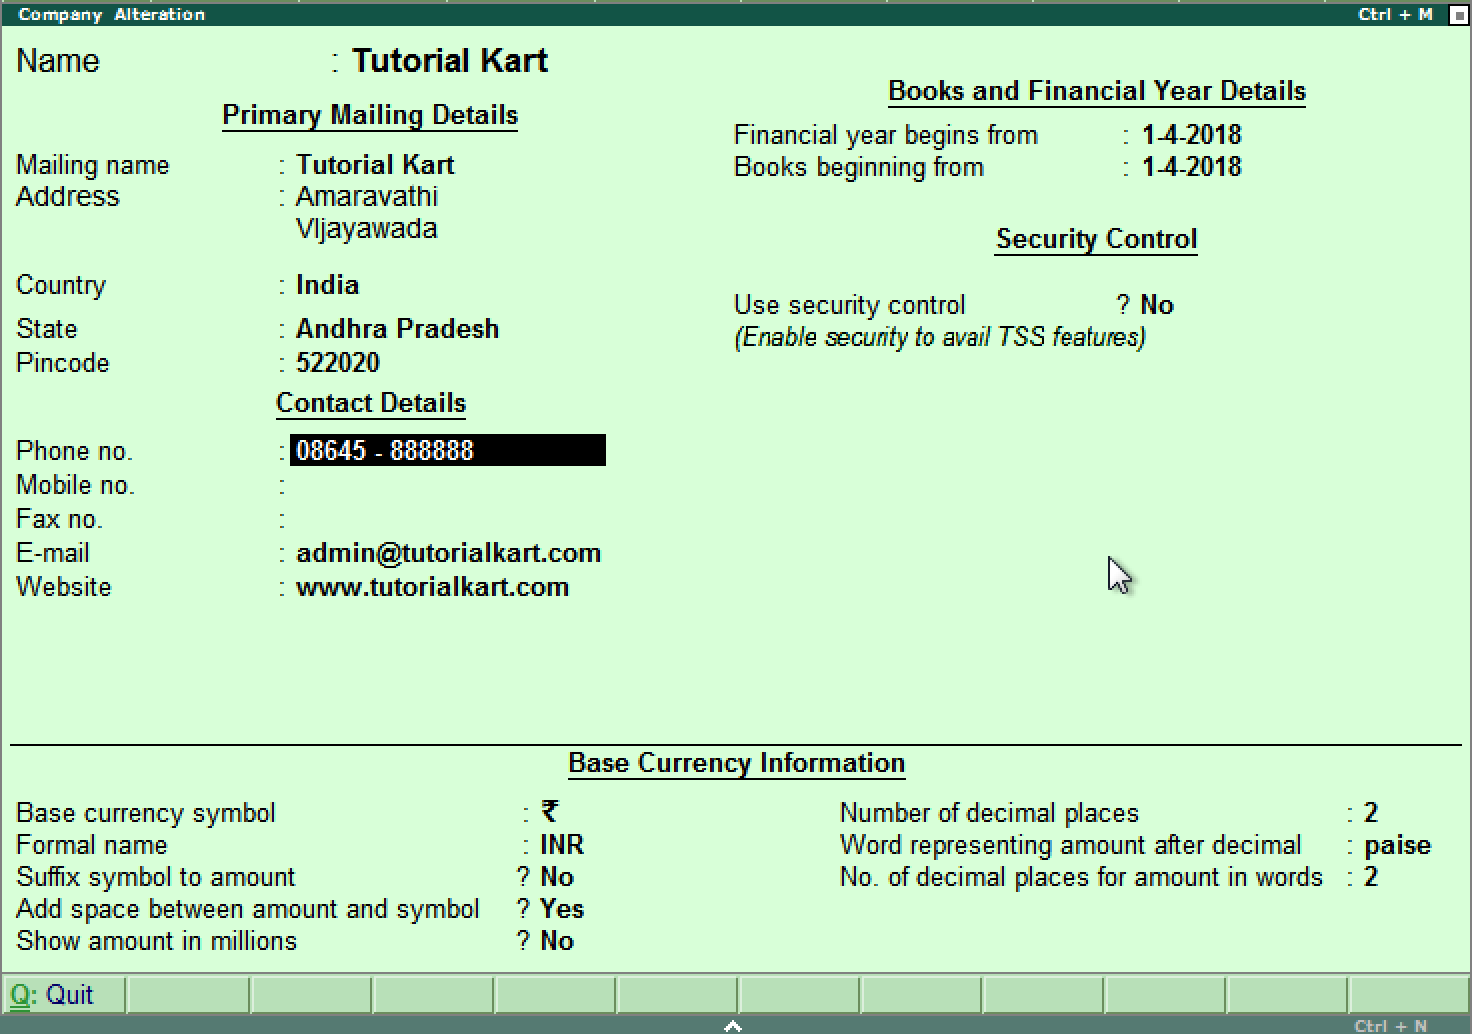
Step 3: On company alteration screen, add and modify the required details and use Ctrl+ A options to save the details. Here we have added contact details of phone number.
How to delete company in Tally ERP 9
If you delate company in Tally, it removes the complete information of company from Hard drive, all the files and directories that are associated with company will be deleted permanently and it can not be reversed.
To delete company in Tally ERP 9: Gateway of Tally > Alt+F3 > Alter > Alt+D.
Step 1: After using Alt+F3 keys, the company information screen displays on the screen. Here the delete option will be not available. Click on alter option.

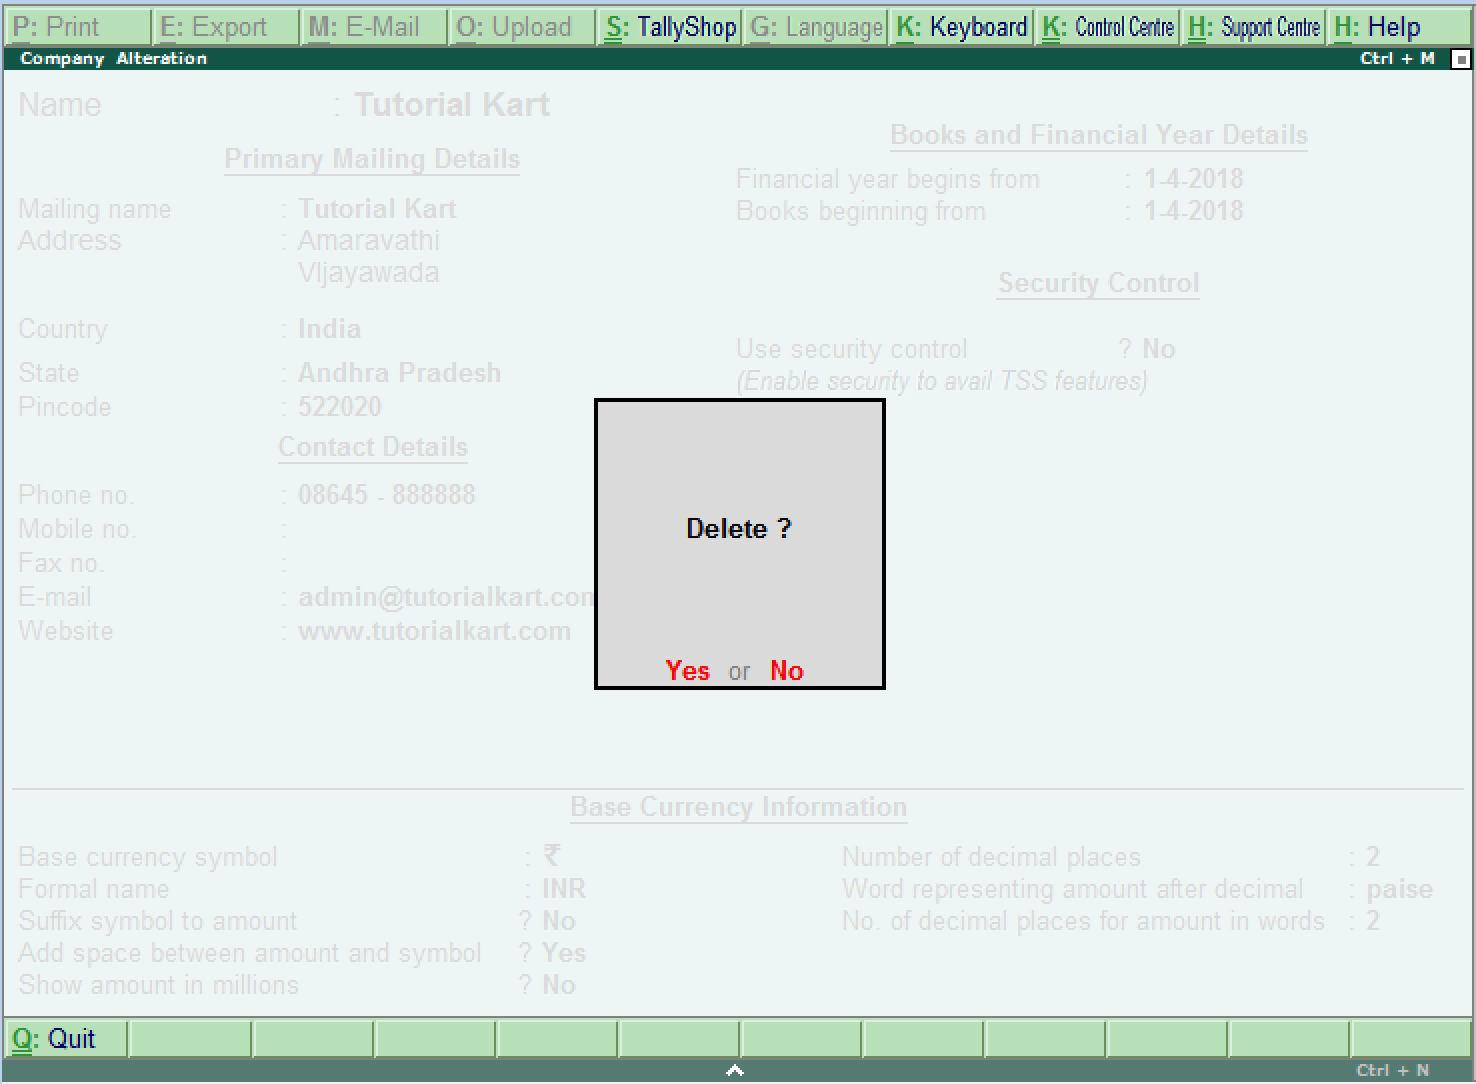
Now selection company and click Alt+D and click on YES option to delete the company in Tally ERP 9.
How to shut company in Tally ERP 9
Shut a company in tally does not mean that delete a company, it means close. After you work with company, press Alt+F1 if you choose more than one company or choose Quit button to close the present company.

No comments:
Post a Comment