Sunday, May 7, 2023
Quickest developing Parttime Freelance Site with 100+ Opportunities
- Flexible work options with 100+ part-time job opportunities to work from anywhere, anytime.
Wednesday, May 3, 2023
Groups in Tally
What are groups in Tally
Group is a collection of ledgers of the same natures. Tally software automatically create 28 groups which are used in the chart of account. Out of 28 predefined groups in tally, 15 groups are primary groups and 13 groups are Sub-groups. The different types of groups are
- Primary Groups
- Sub Groups
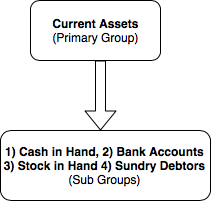
Primary Groups: Primary Group in Tally is main group, Groups are structured as hierarchical organization. At the top of hierarchy are primary groups. Among 15 primary groups, 9 groups are balance sheets items and 6 groups are profit and loss a/c items.
List of Primary Groups in Tally
| 1. Branch/ Divisions | 6. Indirect Income | 11. Current Assets |
| 2. Capital Accounts | 7. Suspense Account | 12. Direct Incomes |
| 3. Sales Accounts | 8. Current Liabilities | 13. Fixed Assets |
| 4. Loans (Liabilities) | 9. Misc. Expenses (Asset_ | 14. Direct Expenses |
| 5. Indirect Expenses | 10. Purchase Accounts | 15. Investments |
Sub Groups: Sub groups are part of primary group, sub groups can be divided into 13 groups.
List of Sub groups in Tally
| 1. Sundry Creditors | 6. Duties & Taxes | 11. Bank Accounts |
| 2. Secured Loans | 7. Deposits (Assets) | 12. Reserves & Surplus |
| 3. Stock in Hand | 8. Bank OD Accounts | 13. Loan & Advances (Assets) |
| 4. Provisions | 9. Unsecured Loans | |
| 5. Cash in Hand | 10. Sundry Debtors |
Tally ERP 9 follows the single ledger concept of accounting and this leads to direct contrast to subsidiary ledger accounting. So all financial entries are performed using ledgers or account heads. You can group all ledgers and financial statements can be drawn according to requirements of company.
Important tutorials related to groups
- How to create a group
- How to create single group
- How to primary group
- How to delete group
- How to create multiple groups
How to Create Group in Tally and How to Alter & Display
In this Tally Tutorial, we shall learn how to create group in Tally ERP 9 and how to alter and display created groups.
If you are creating groups in Tally for the first time, it is recommended to enable
- Provide advanced information in masters
- Allow advanced entries in masters
Path: Gate way of Tally –> F12: Configure –> Accts / Inventory Info –> Accounts
How to create Group in Tally
Maintain the following Sundry Debtors Ledgers Accounts in Tally.ERP 9
- Main Groups: South India Debtors Group and North India Debtors Group under Sundry Debtors
- Sub-Groups: Bangalore debtors, Vijayawada debtors and Hyderabad Debtors under South India Debtors
- ABC limited & Tech solutions grouped under North India Debtors.
Step 1: Go to Gateway of Tally and click on accounts Info
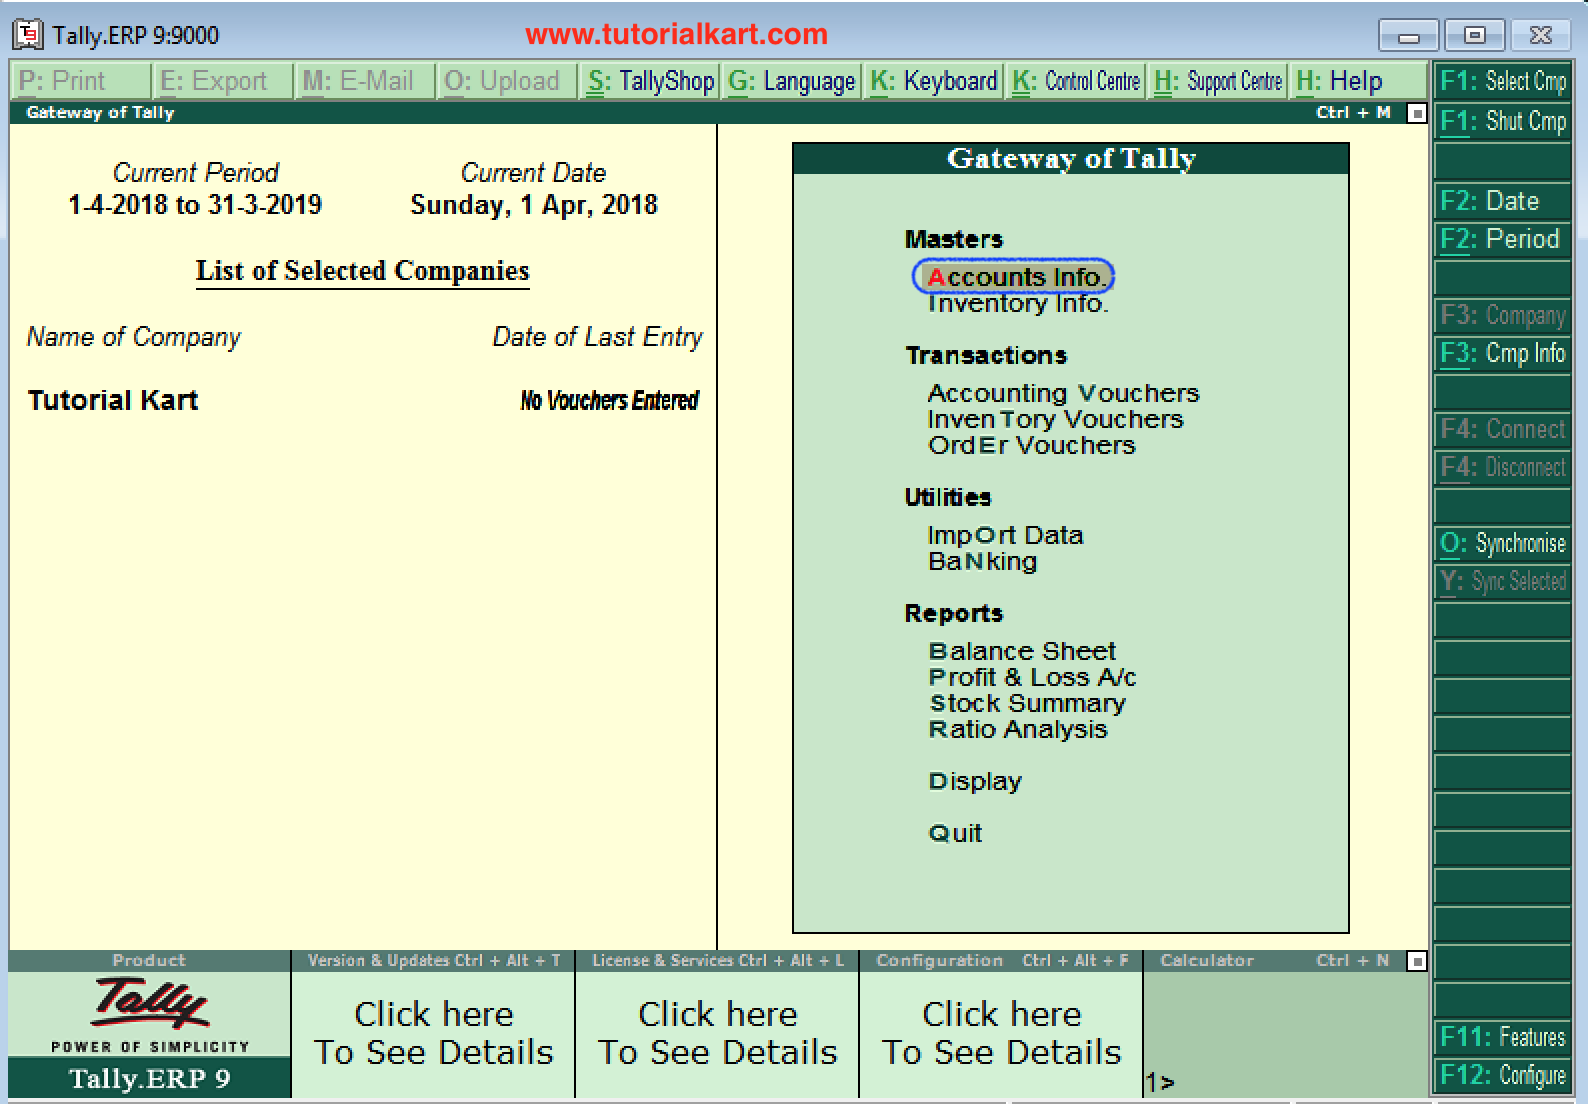
Step 2: Under Accounts info, choose the option Groups.
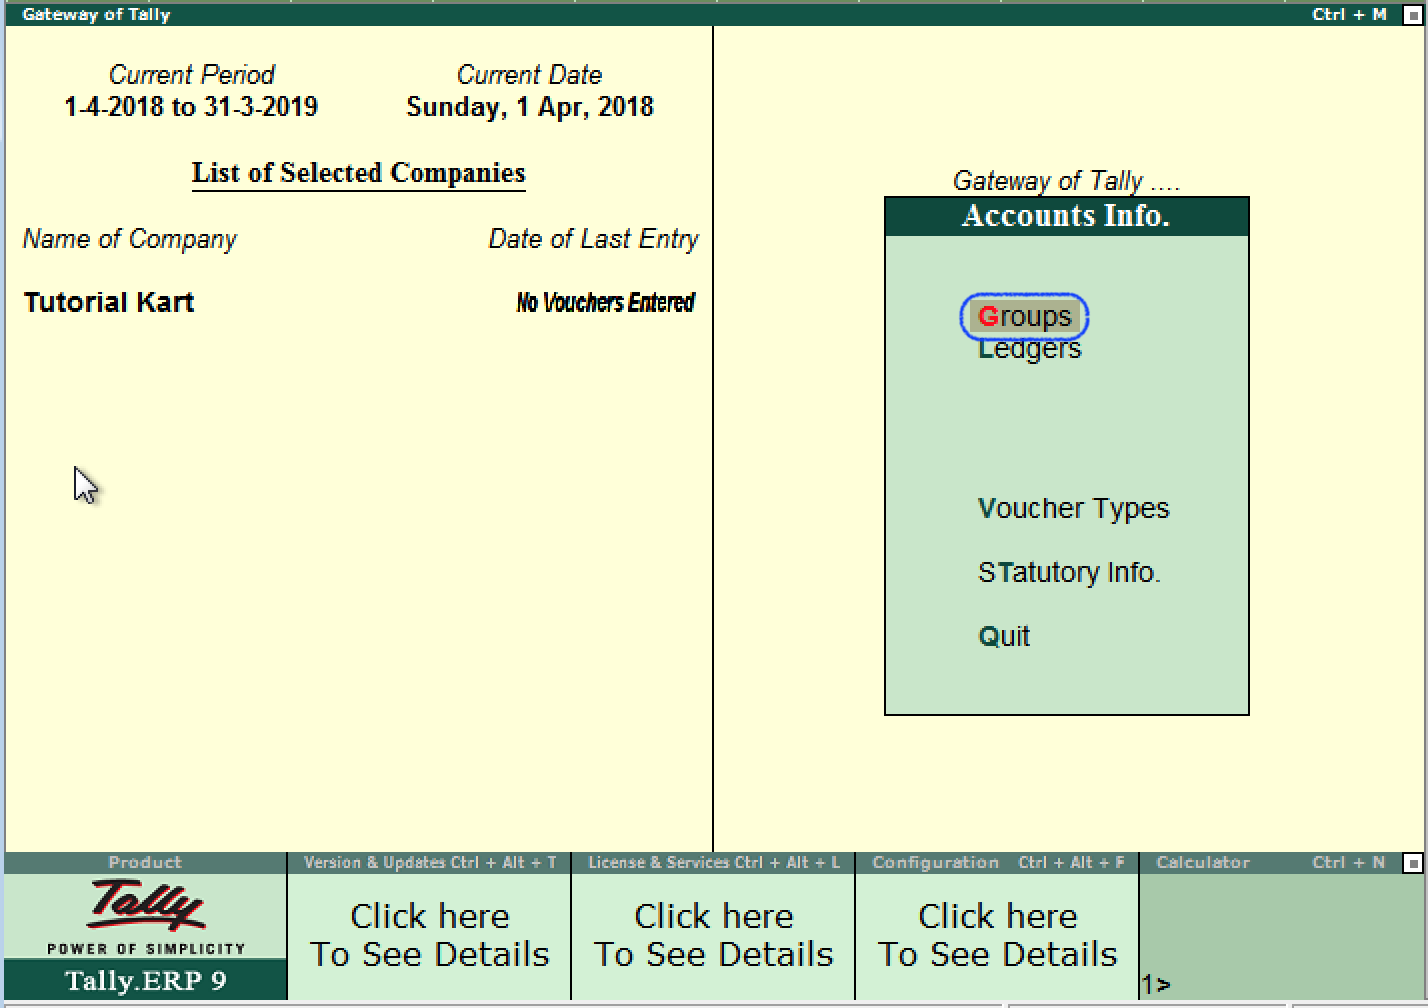
Step 3: Under Single Group menu, choose the option create to create single group in Tally ERP 9
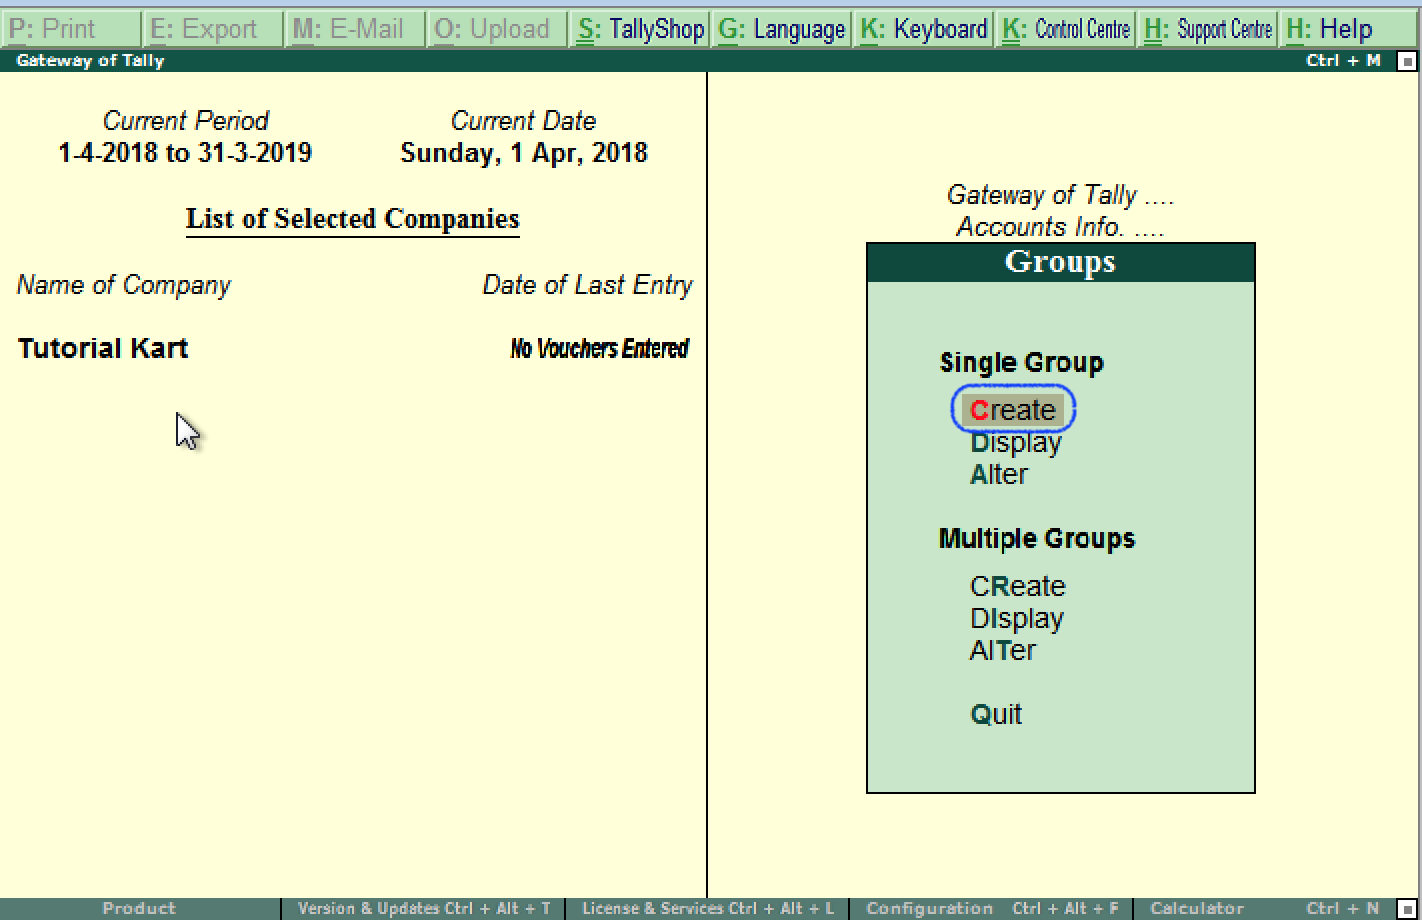
Step 4: On Group creation screen, update the following details.
- Name: Enter the name of group and press enter to continue
- Under: Choose the group name from list of groups as Sundry debtors (You can move to group name pressing upper or lower key).
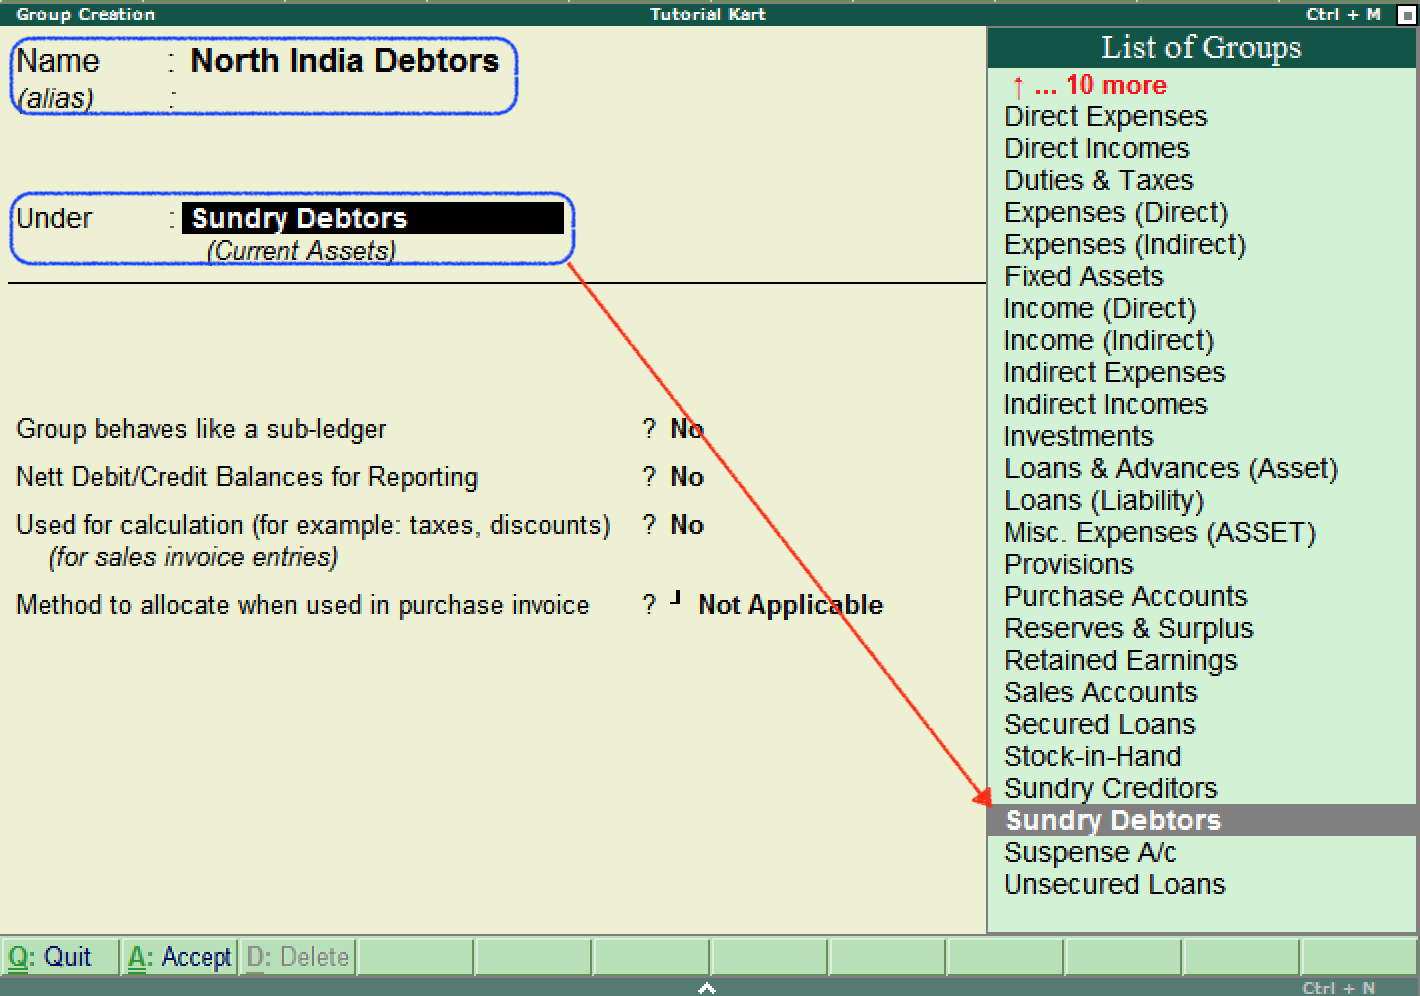
After entering the required details, press enter or Ctrl+A / A:Accept to save the details.
Note: After creation of new group in Tally, created group displays under the list of groups.
Also create other groups using above procedure
- South-India-debtors under Sundry Debtors
- Bangalore debtors, Vijayawada debtors and Hyderabad Debtors under South India Debtors
- ABC limited and Tech Solutions under Bangalore Debtors.
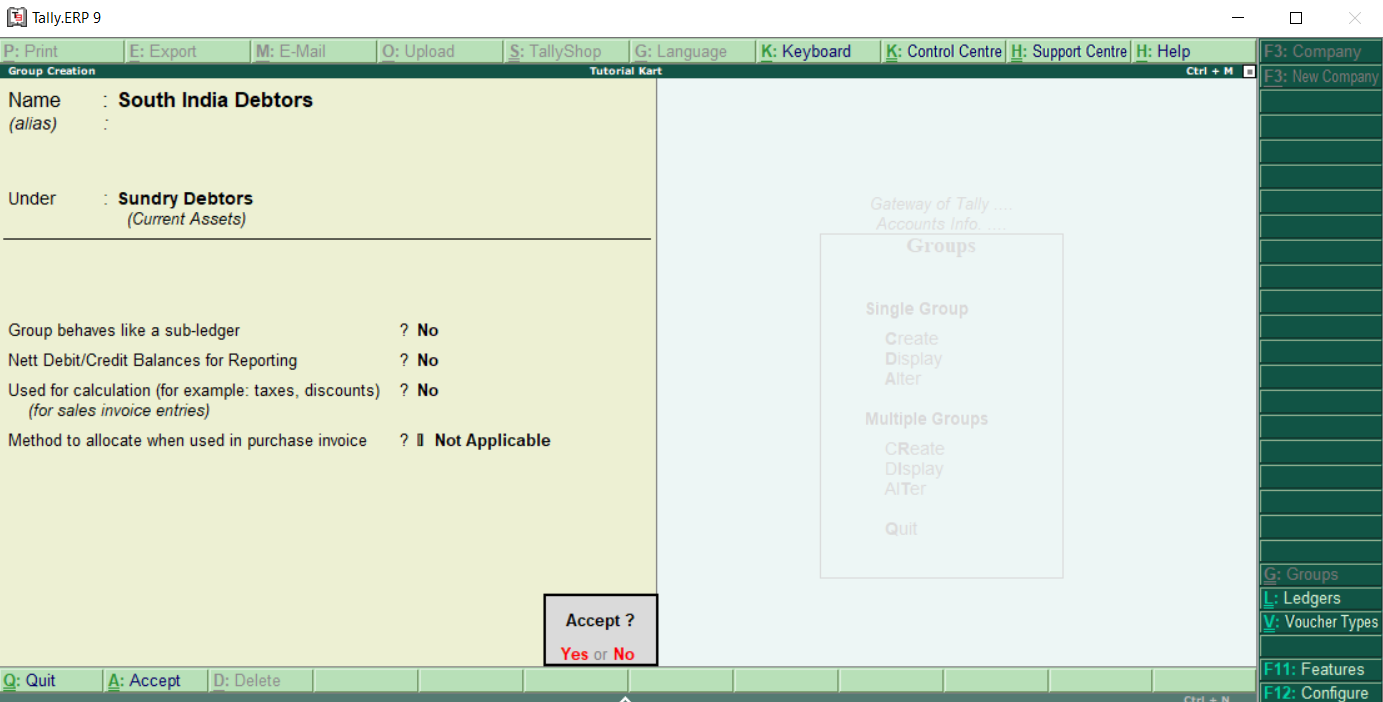
Tally.ERP 9 allows to create any number of groups under all default groups. Here we have created two groups under Sundry Debtors i.e. South India Debtors and North India Debtors. And three sub-groups (Bangalore debtors, Vijayawada debtors and Hyderabad Debtors) created under South India Debtors.
How to Display a Group in Tally
After groups are created in Tally ERP 9, you can display all the created groups with details. However in display mode, users are not allowed to edit/ alter the data.
Step 1: Path: Gateway of Tally > Accounts Info > Groups.
Step 2: Click on the option display under single group to displays groups in Tally.
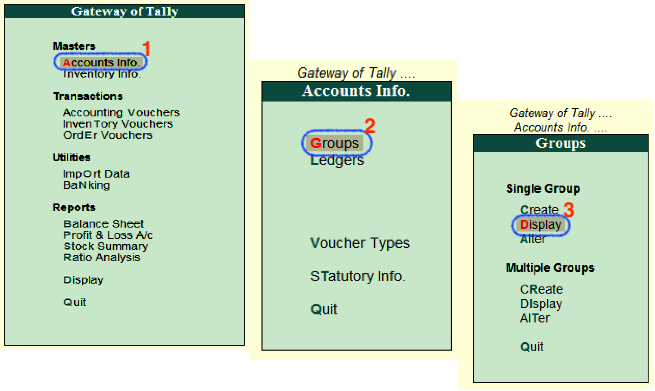
Step 3: Under list of groups names, choose the required group name and click on that particular group to display on the screen.
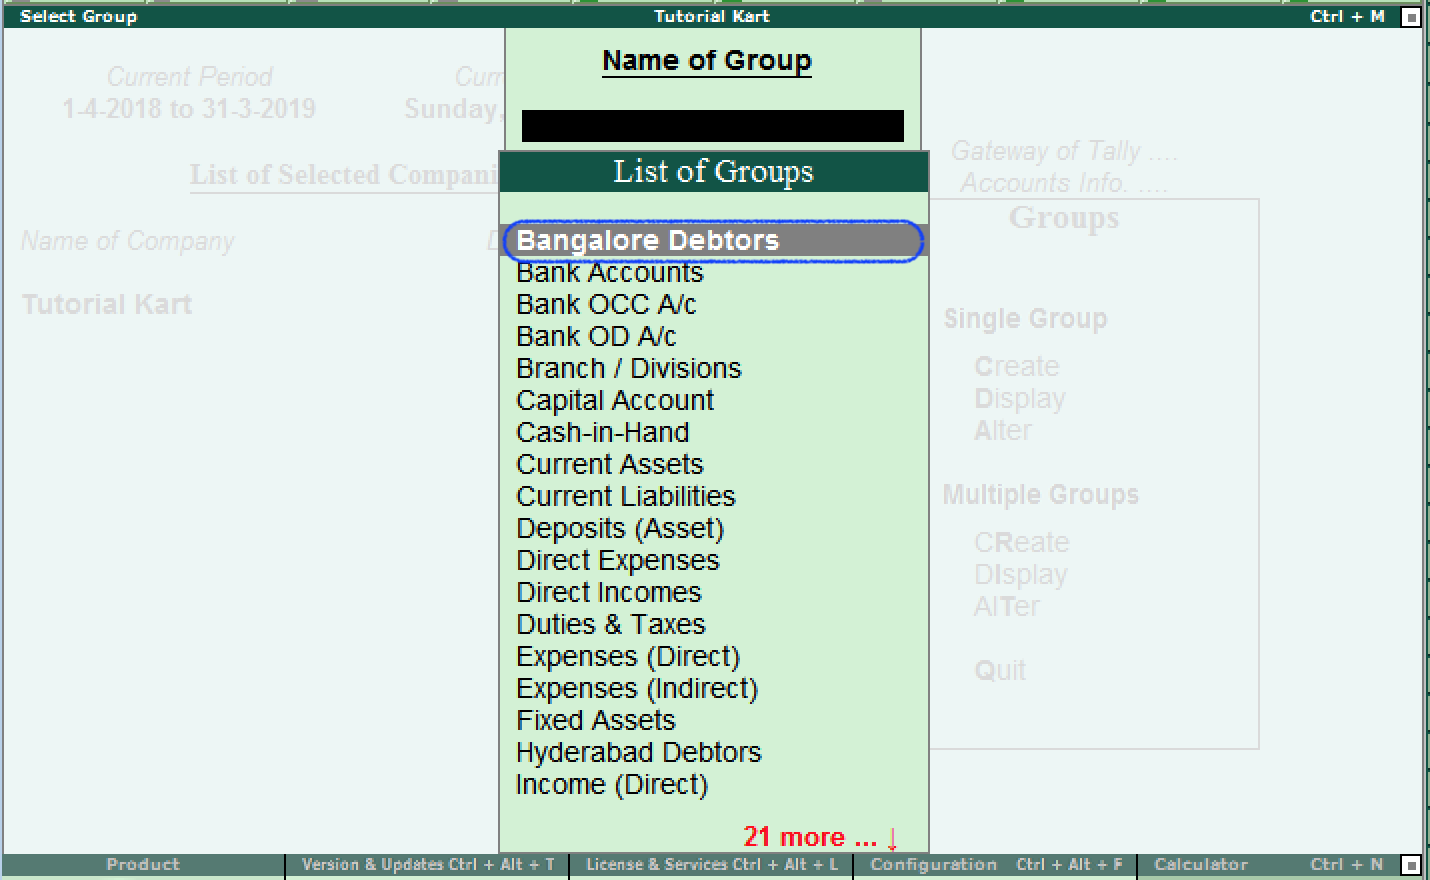
Now the ledger (Bangalore Debtors) display on the screen as
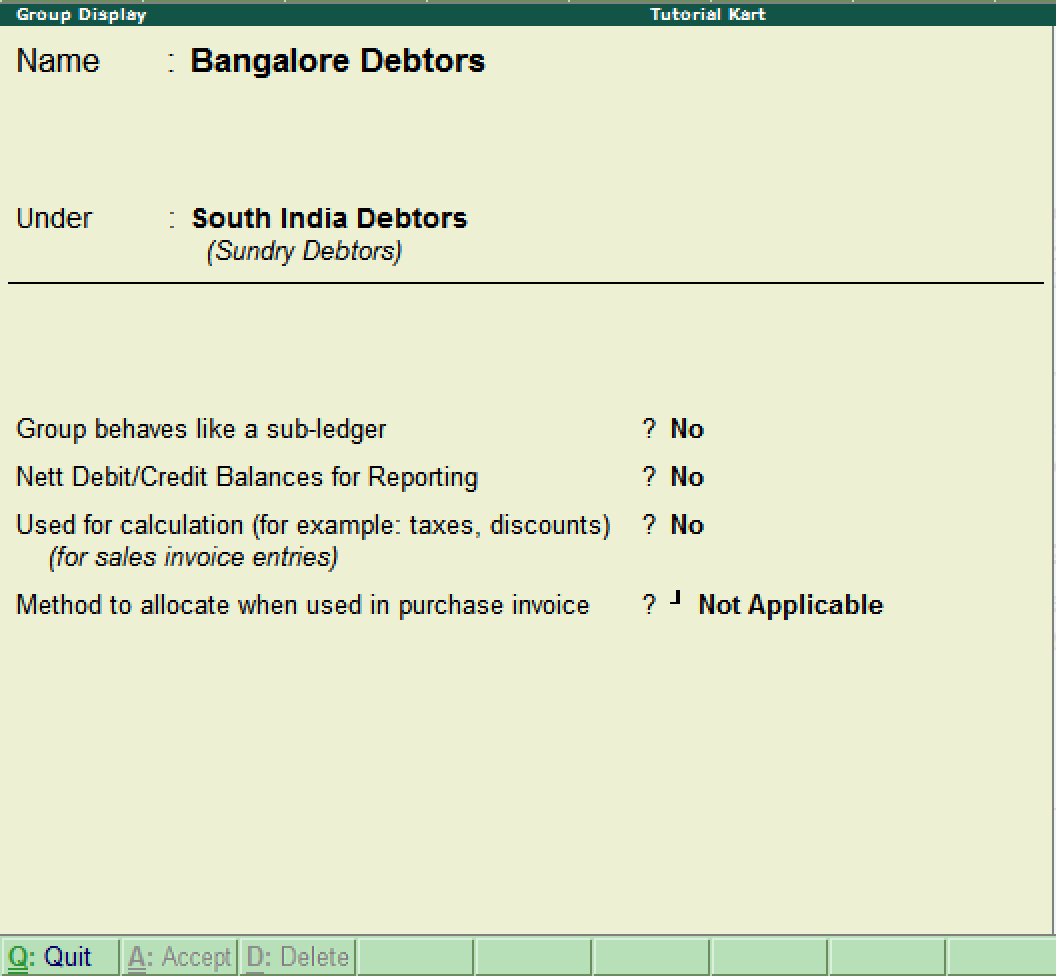
Click on Q: Quit to close the screen.
How to Alter Group in Tally ERP 9
After groups are created in Tally.ERP 9 application, the details can be alter as per the requirements. To modify/ alter group in tally, refer below steps:
Step 1: Goto Gateway of Tally -> Accounts Info –> Groups.
Step 2: Under single group, click on alter option.
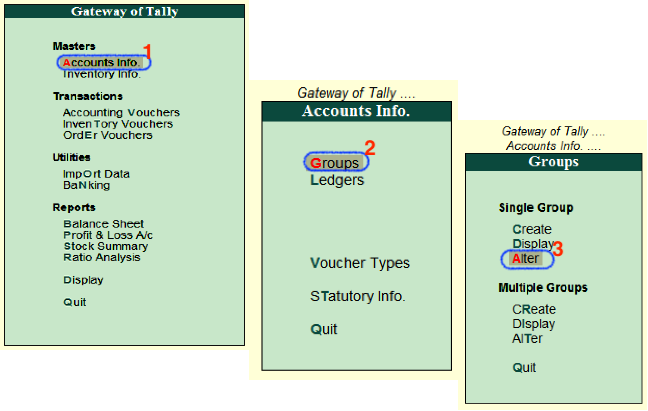
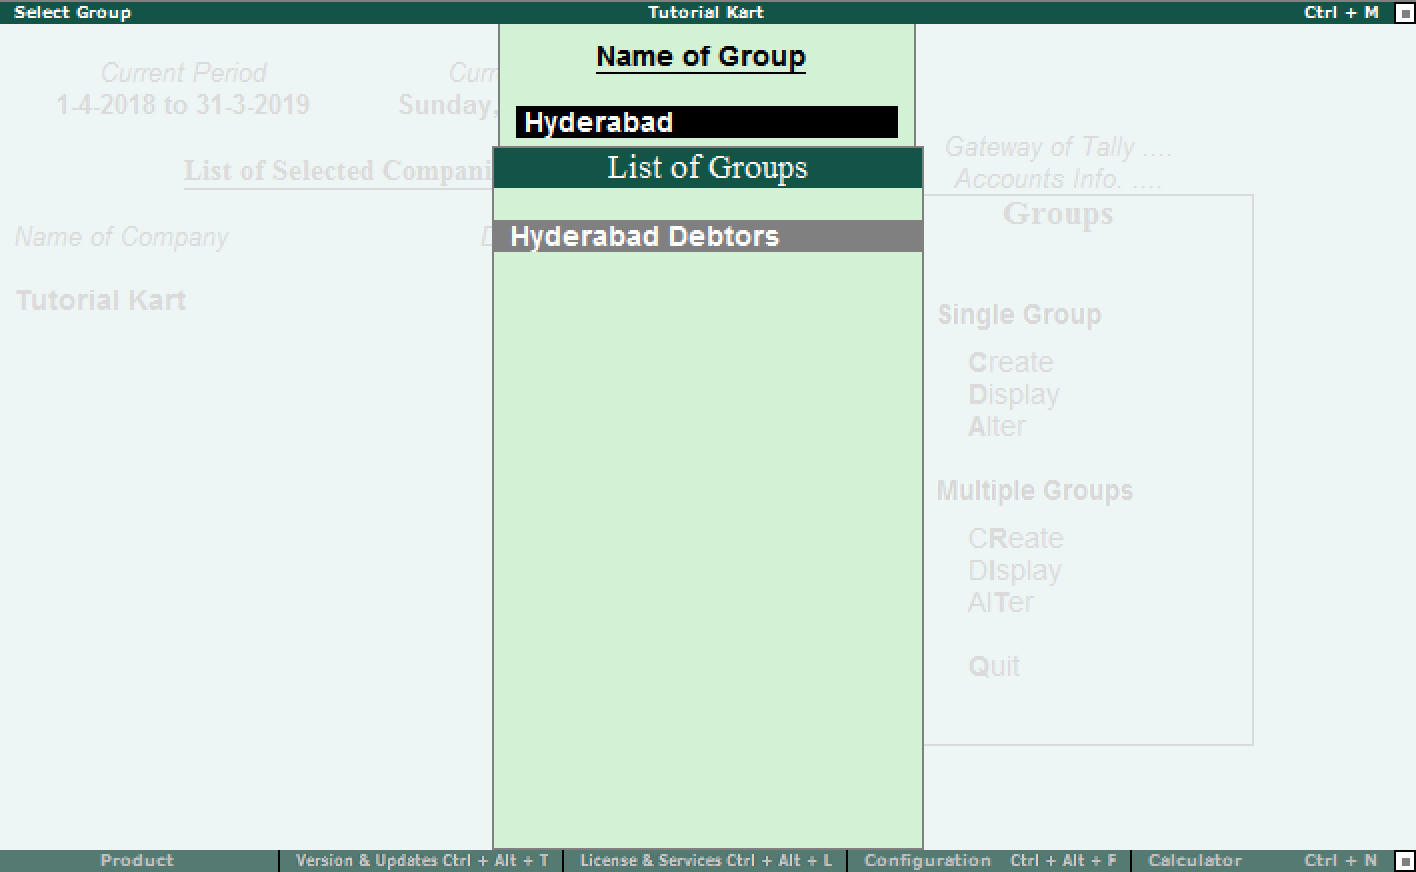
Step 3: You can search the group from the given search field and click on that group name to modify the details.
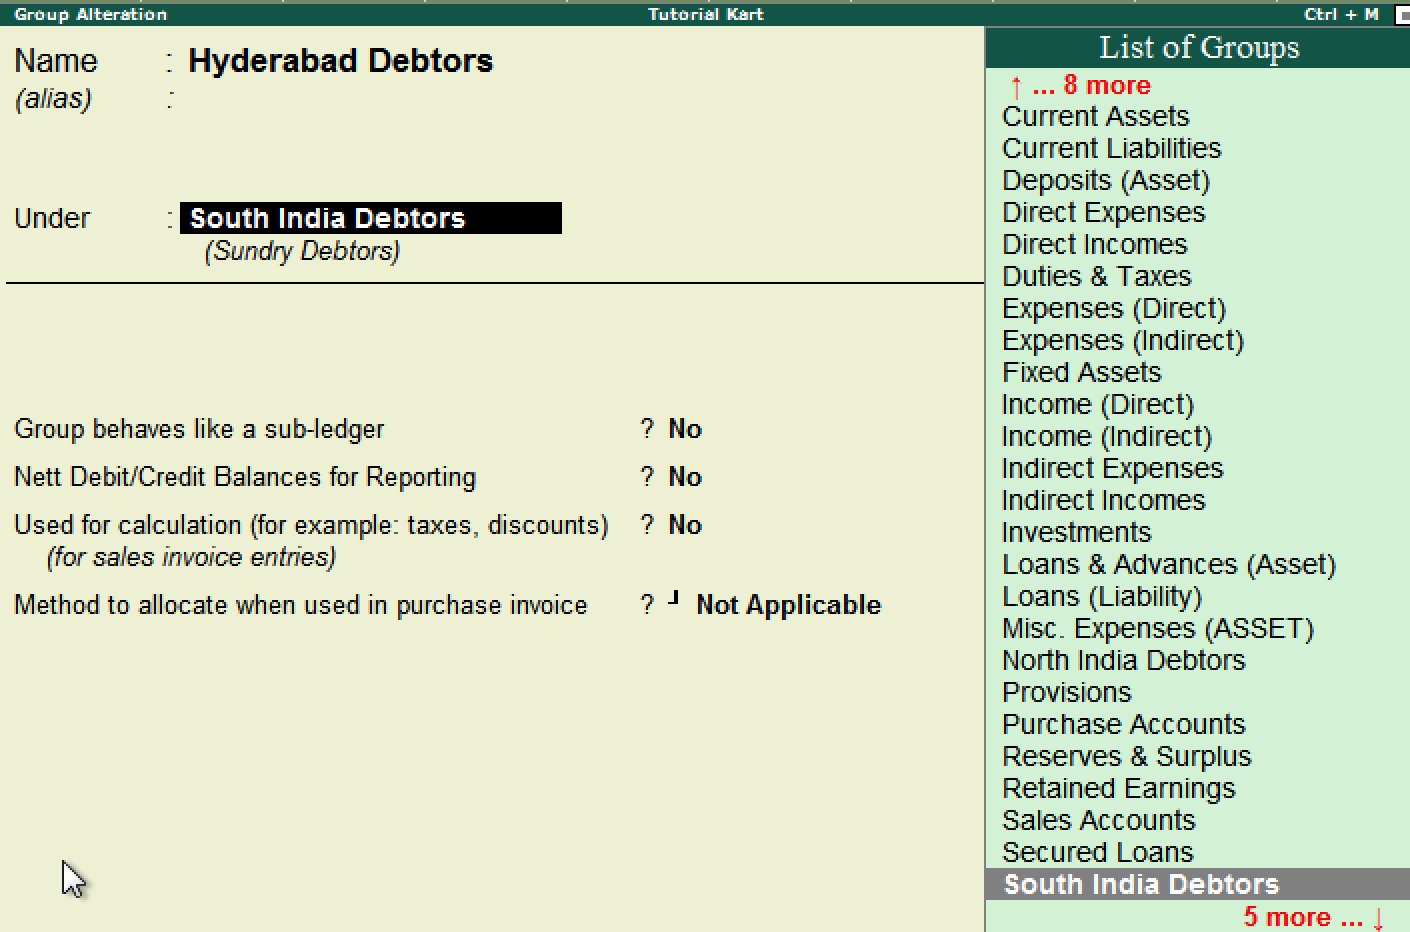
Step 4: On Group Alteration screen, update the required details and click A: Accept to save the details.
Now learn how to create ledgers for ABC limited and Tech Solutions under Bangalore Debtors.
How to Create Single Ledger in Tally
Create Single Ledger in Tally.ERP 9
In this Tally tutorial, we shall learn how to create single ledger in Tally step by step.
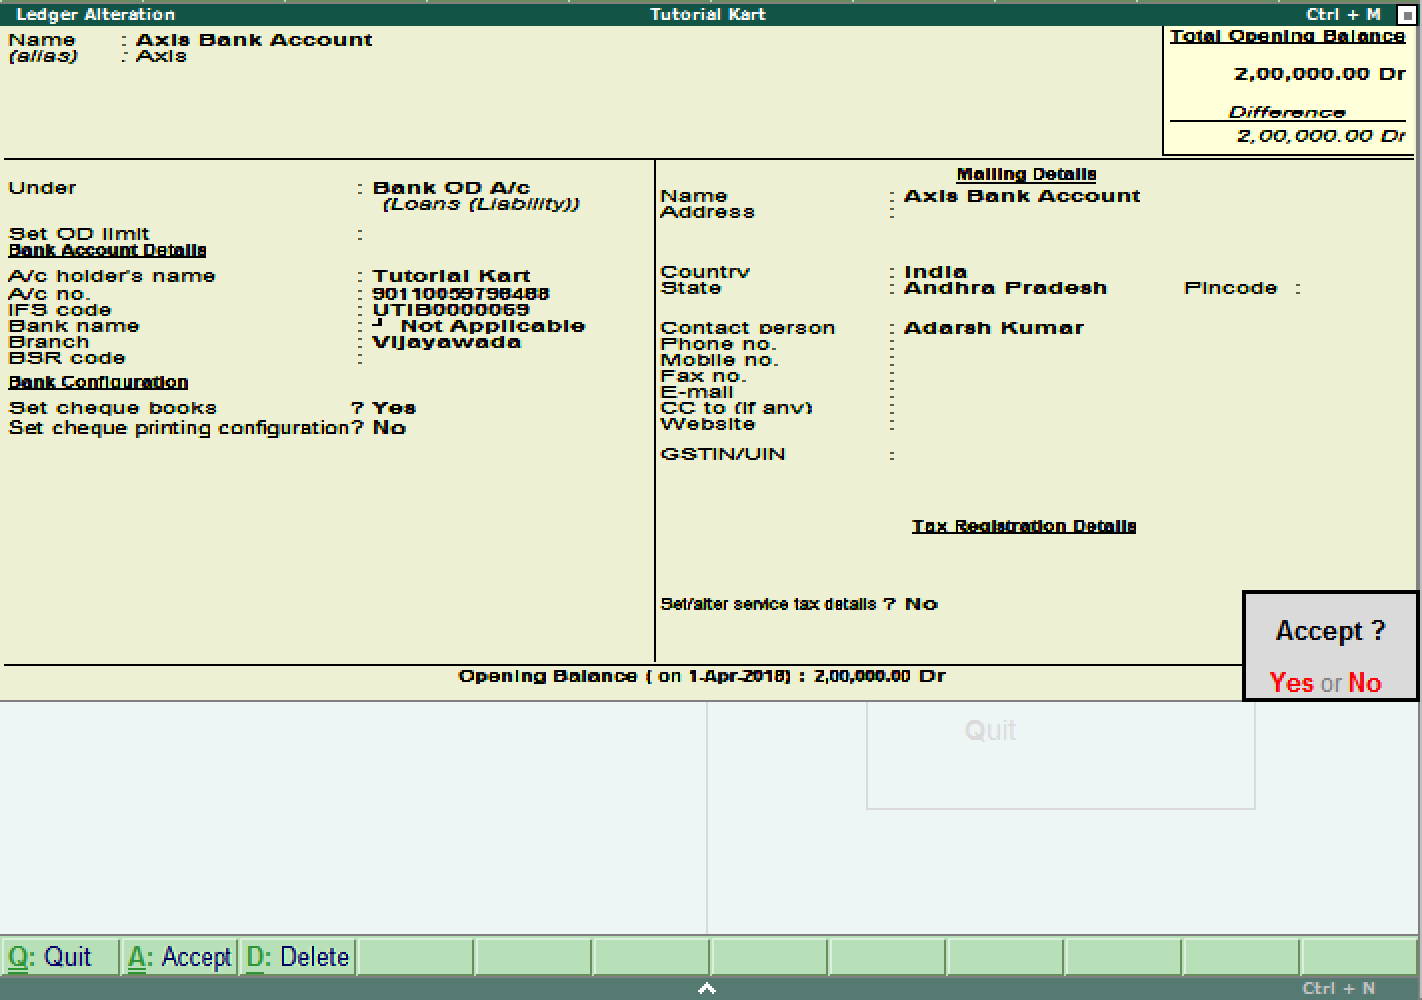
Note: In this lesson, we are going to create ledger Axis Bank Account under Bank Account.
The date that required for ledger depends upon the features opted by us. If the settings of accounting features (F11) of company were “NO” for all options, than the ledger screen provides with minimal information.
Tally.ERP 9 automatically creates two ledger accounts i.e. Cash in Hand and Profit & Loss Account. We can create the ledger accounts as per requirements of an organization. We can not create another profit & loss account in tally, and we can create any number of cash accounts with different names (Petty Cash).
How to create ledger account in Tally ERP 9
Path: Gateway of Tally –> Accounts Info –> Ledgers –> Single Ledger –> Choose Create
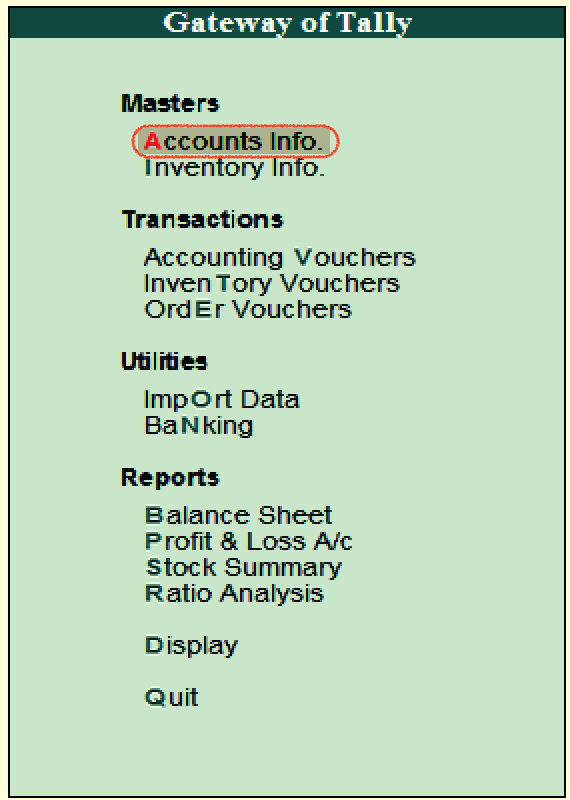
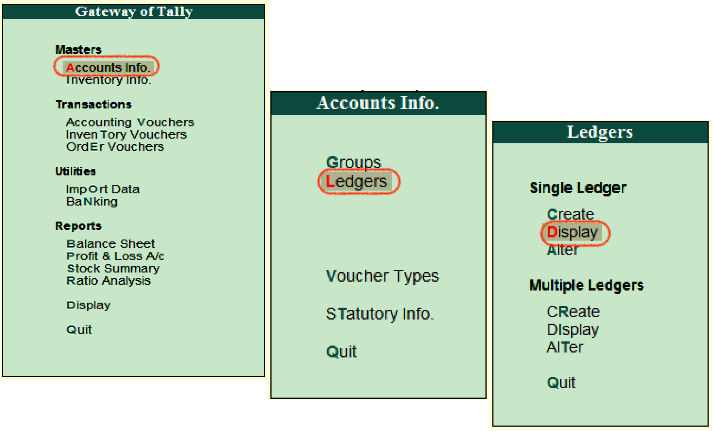
Step 1: From Gateway of Tally Screen, click on accounts info
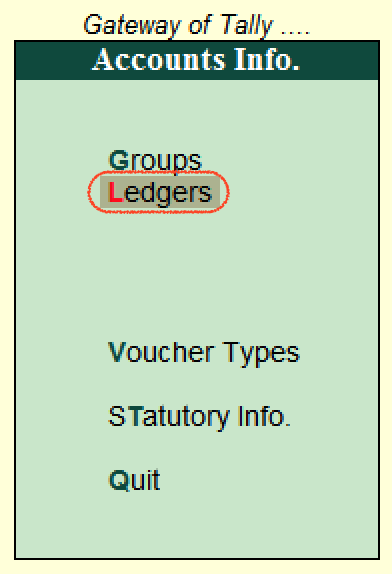
Step 2: In the next screen, choose “Ledger”
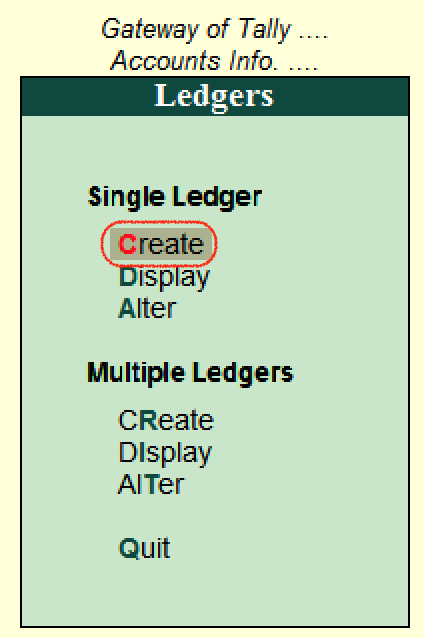
Step 3: In the next ledger screen, choose the option create under single ledger
Step 4: On ledger creation screen, update the following details
- Name: Enter the name of ledger account, and the name should be unique.
- Under: Choose the group name from list of group, that pertains to ledger account.
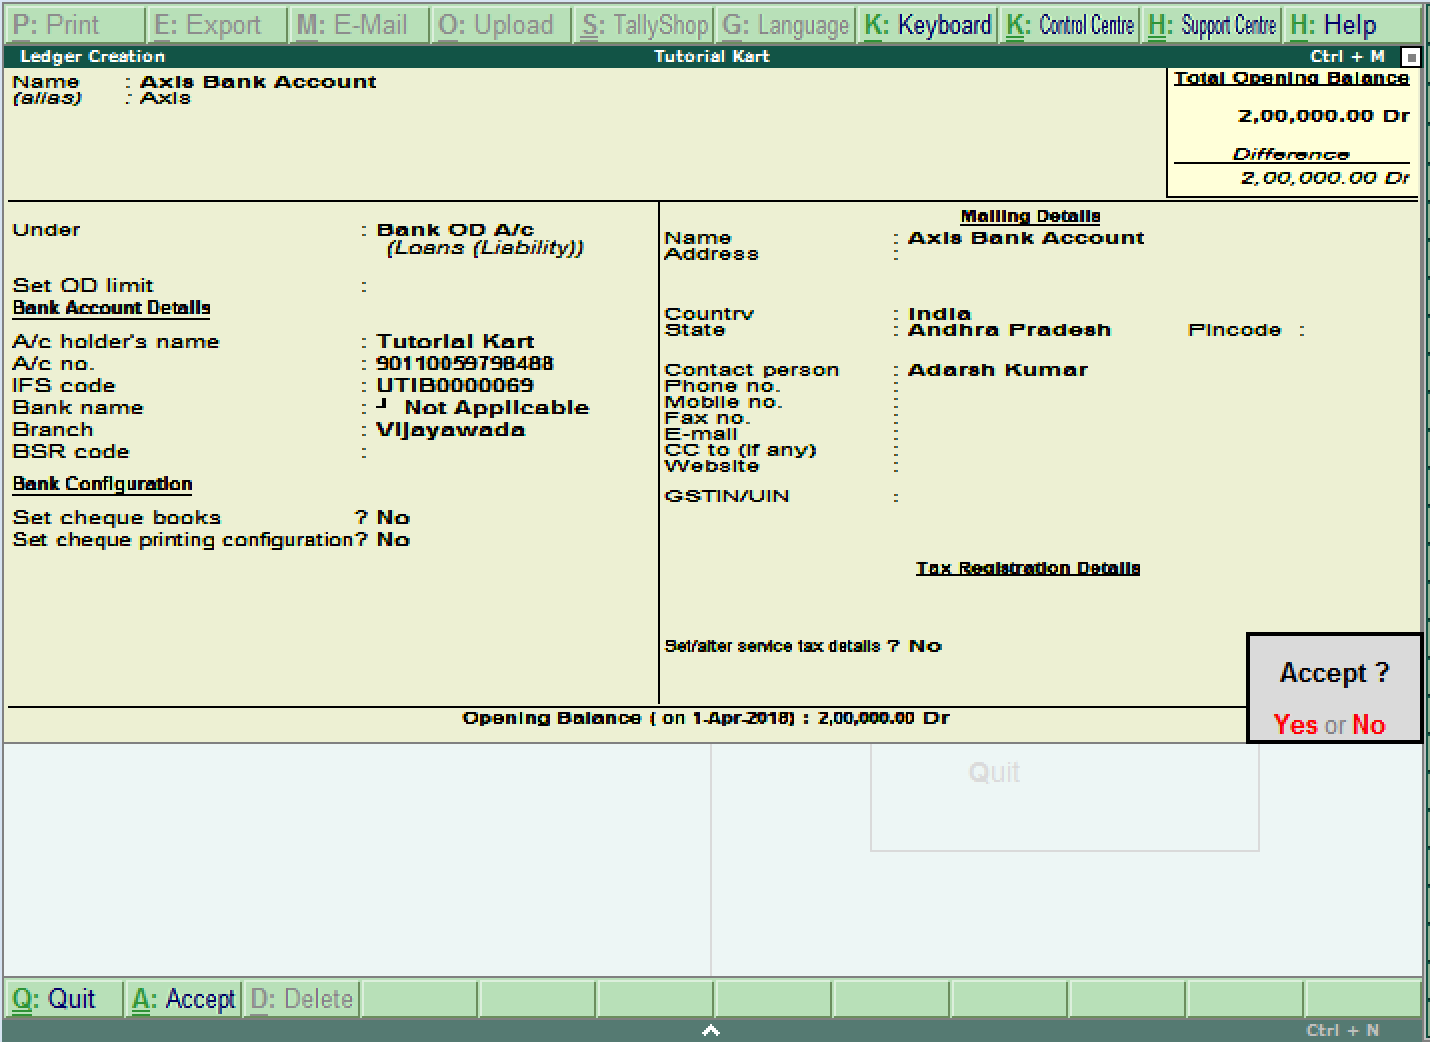
After maintaining all the required details, choose Yes option under Accept to save the configured details in Tally.ERP 9.
How to display single ledger in Tally
After creation of single ledger account in Tally, you view the details of ledger by choosing the option display. Refer below steps how to display single ledger
Path: Gateway of Tally –> Accounts Info –> Ledgers –> Single Ledger –> Choose Display
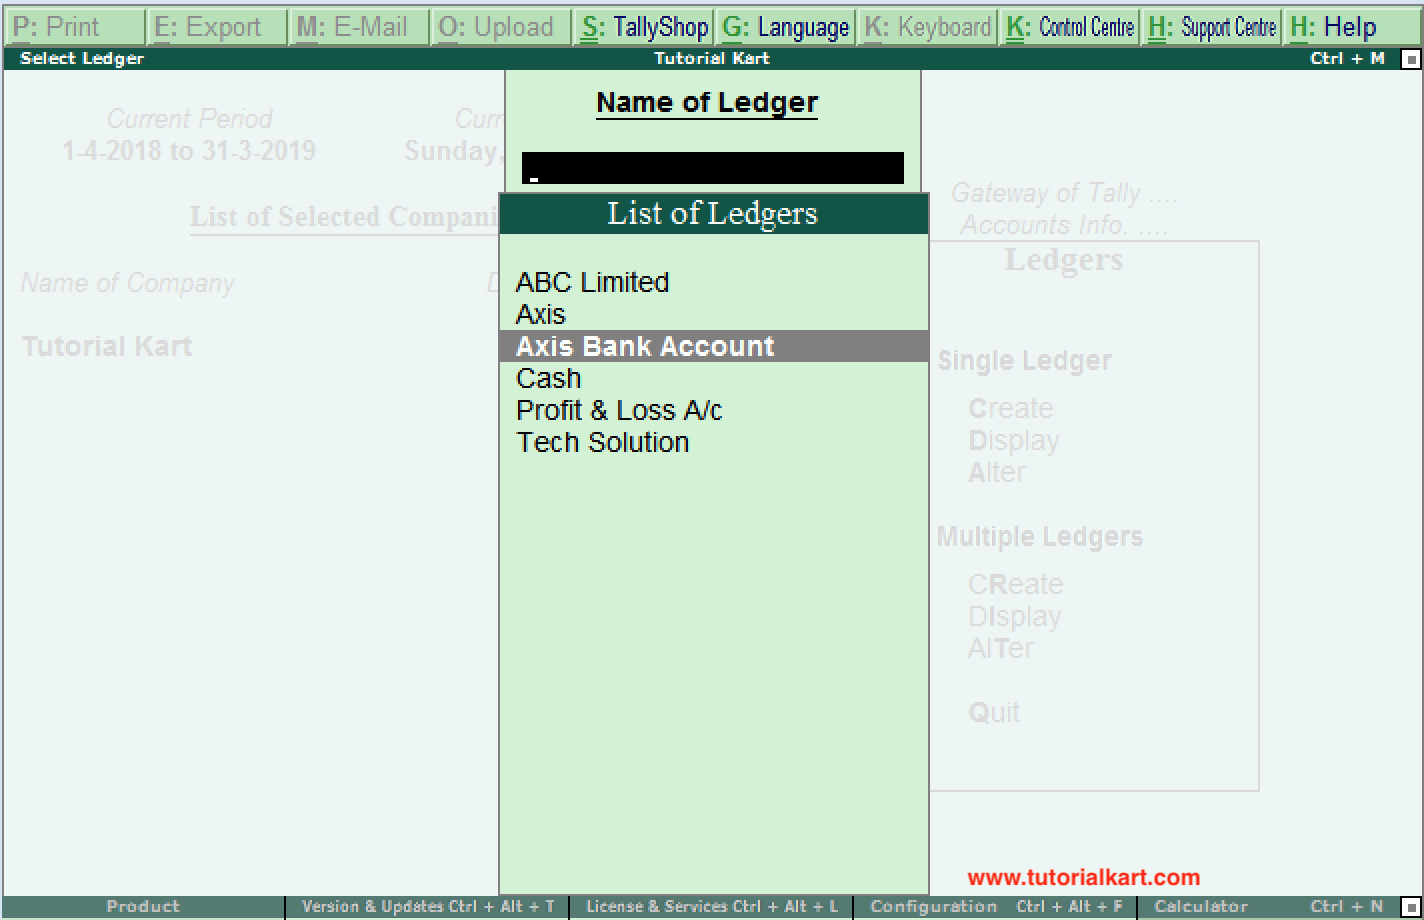
Choose the ledger account from list of ledgers
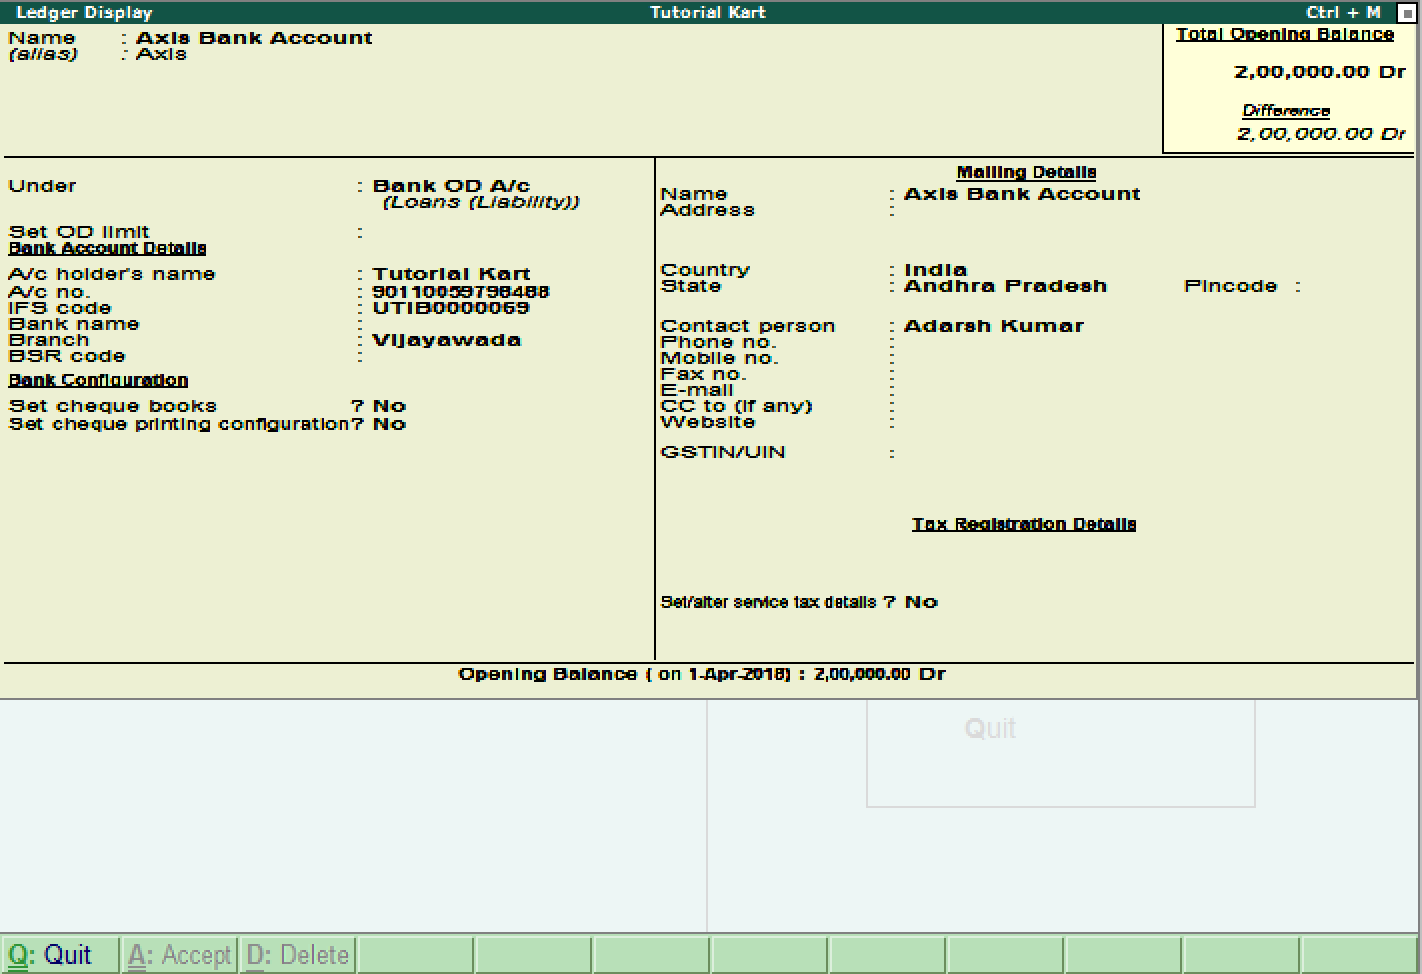
Now the complete details of ledger account display in the screen as shown below image.
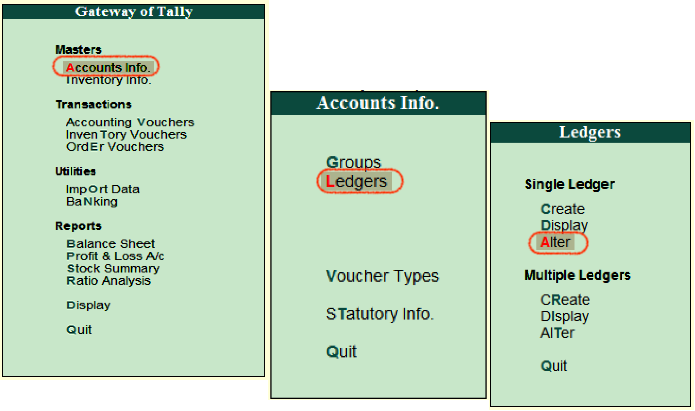
How to Alter Single ledger in Tally
Path: Gateway of Tally –> Accounts Info –> Ledgers –> Single Ledger –> Choose Alter
On select ledger screen, choose the ledger account from the list of ledgers

Now modify/ alter the required details for ledger account and click on A:Accept to save the changed details in Tally ERP 9.
How to Create Ledgers in Tally (Multiple Ledgers)
Create ledgers in Tally
In this Tally tutorials, we shall learn how to create ledgers (multiple ledgers) in Tally.ERP 9. After creation of groups, you can create ledgers under groups in Tally.
Step 1: Goto Gateway of Tally and Choose Accounts Info.

Step 2: Under account info, choose the option Ledgers

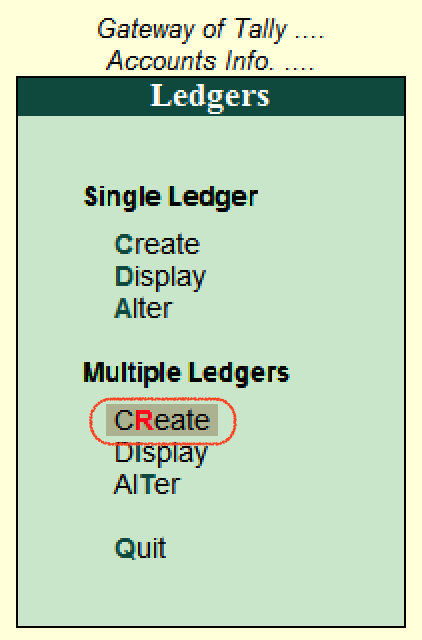
Step 3: Click on create under multiple ledgers option to create multi ledgers in Tally
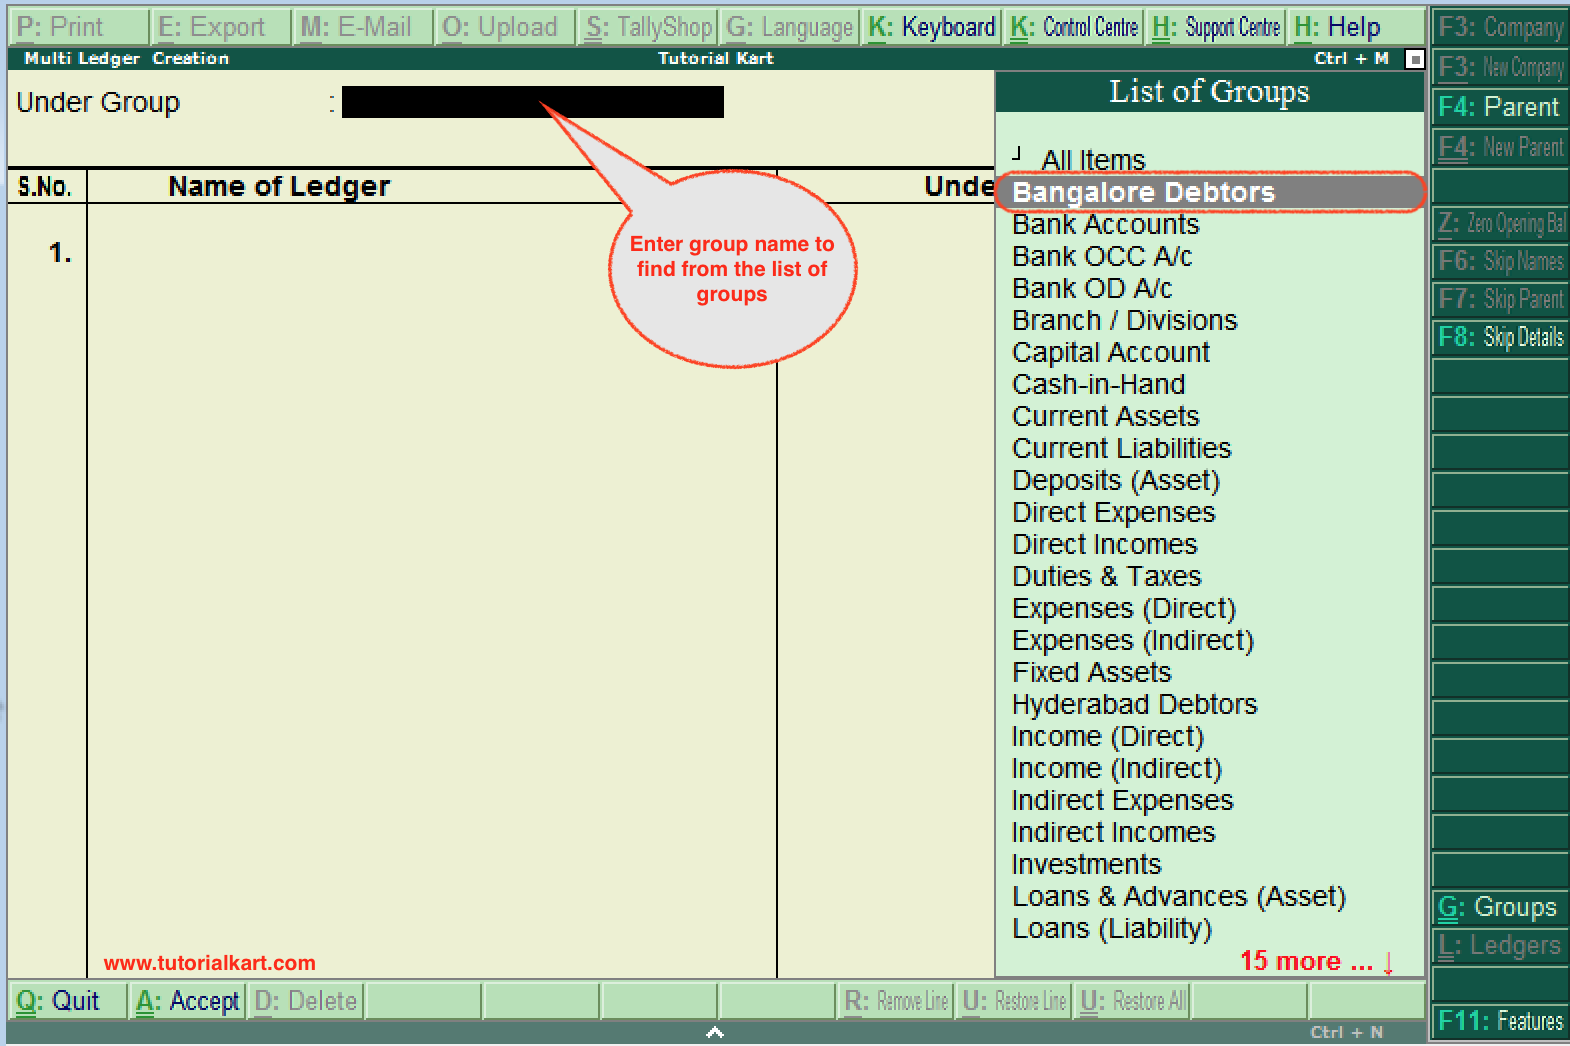
Step 4: On multi ledger creation screen, enter the following details
Under Group: Choose the Bangalore Debtors under the list of groups, however you can search group by entering the group name in the given under group text field.
Step 5: Under Group: Bangalore Debtors screen, update the following details.
- Name of Ledgers: Enter the name of ledger that you like to create in Tally
- Under: The under group field will be automatically filled by Tally as Bangalore Debtors ( As we are creating ledgers under Bangalore Debtors).
- After entering the details, press enter to continue. You will get messages as Accept: Yes or No, choose Yes to accept the updated details in Tally.ERP 9.
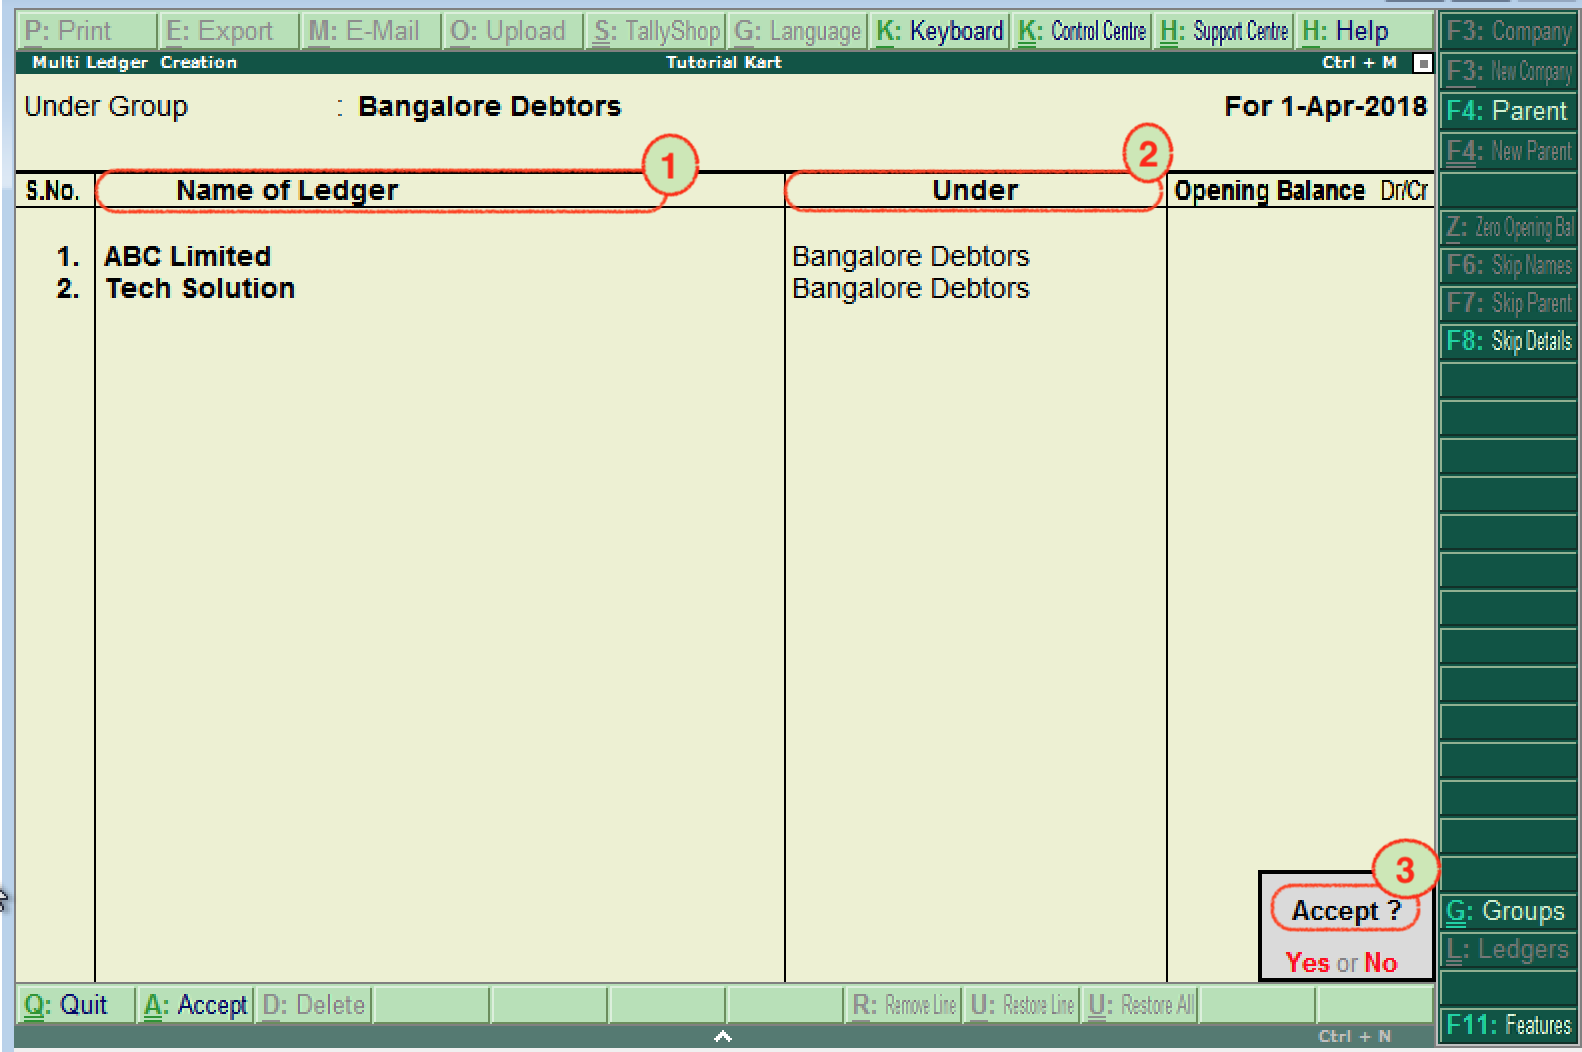
Successfully we have created multiple ledgers in Tally ERP 9.
How to display Multiple Ledgers in Tally.ERP 9
After ledgers are created in Tally application, we can check multiple ledger by choosing the display option.
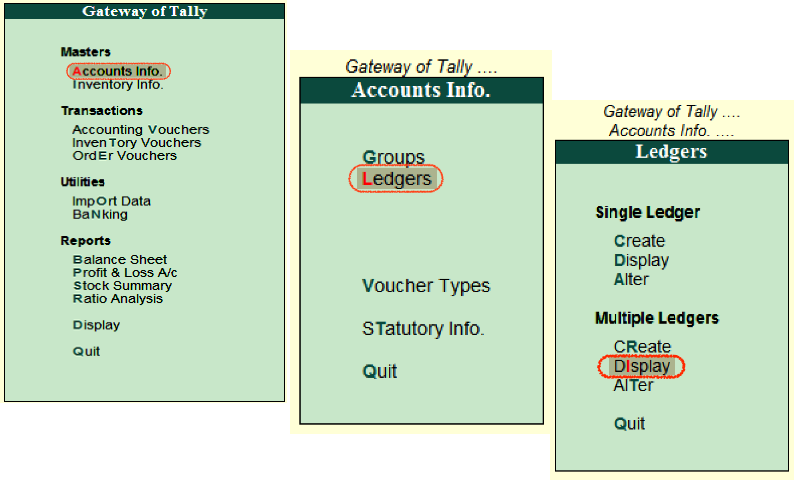
Path : Gateway of Tally –> Accounts Info –> Ledgers –> Multiple Ledgers (Display).
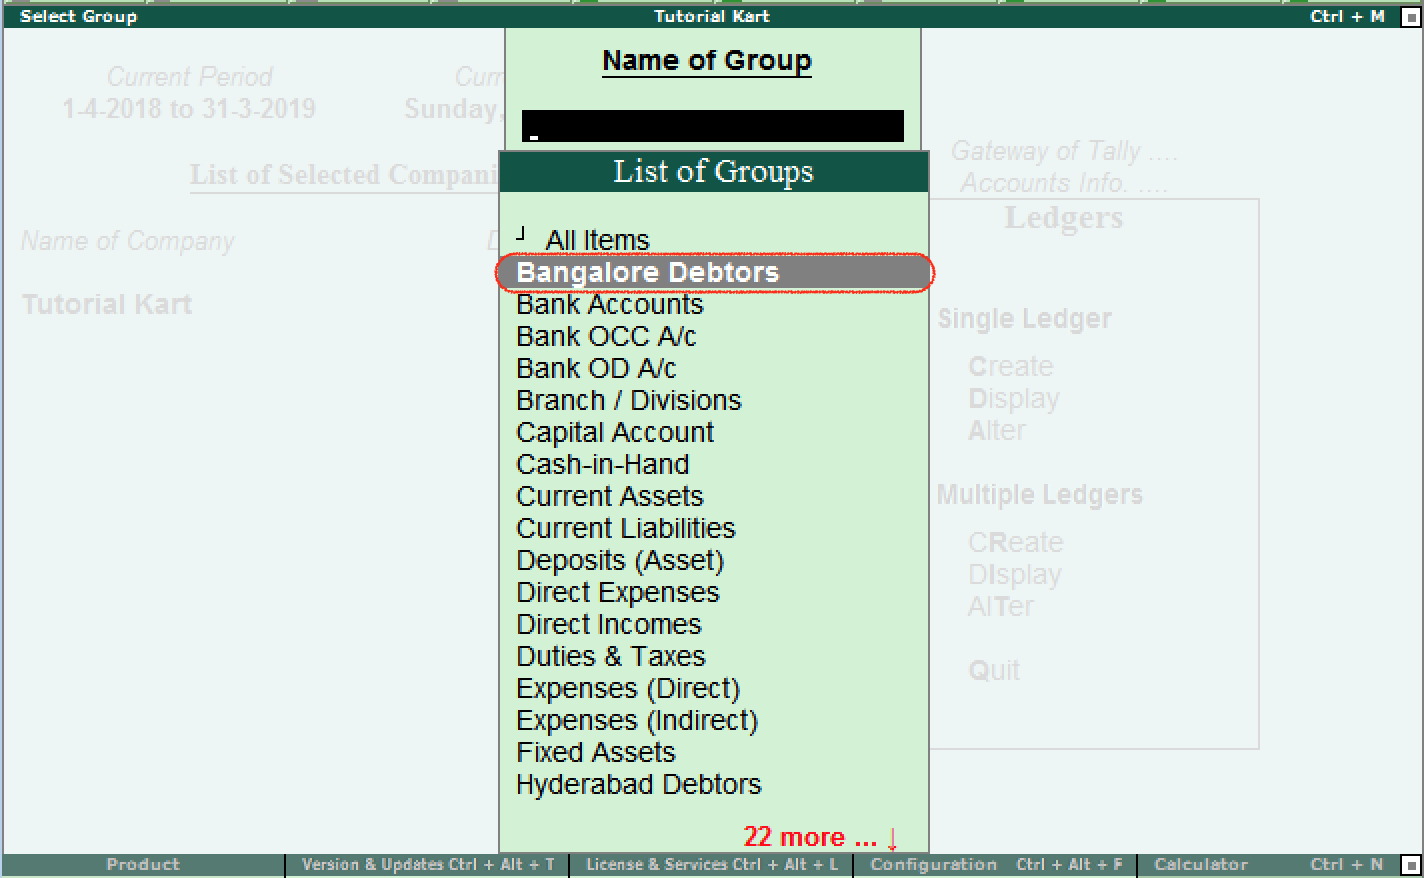
On select group screen, choose the group name “Bangalore Debtors” from the list of groups.
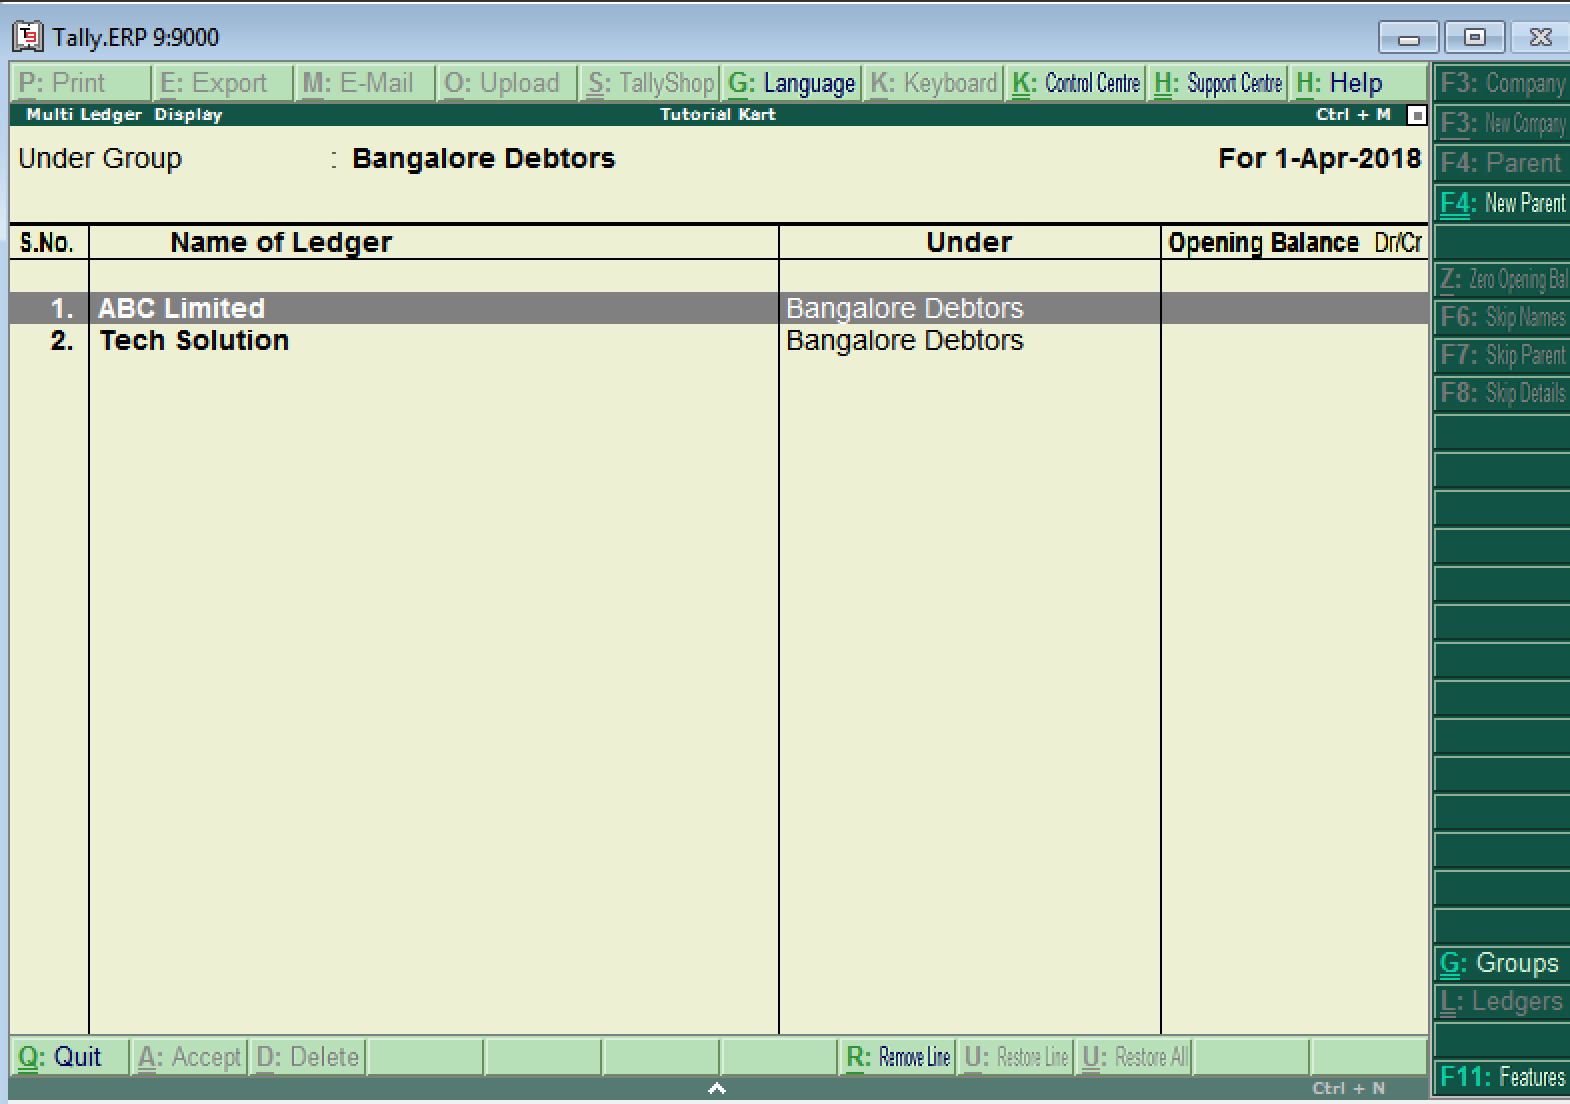
Now the multi ledger screen displays as shown below.
Note: In this display mode, users are not allowed to modify any changes. For this user are required to choose the alter option.
How to change/ alter multi ledgers in Tally ERP 9
The path for alter multiple ledger is same as create and display. Through this alter mode, you can change the details as per the requirements.
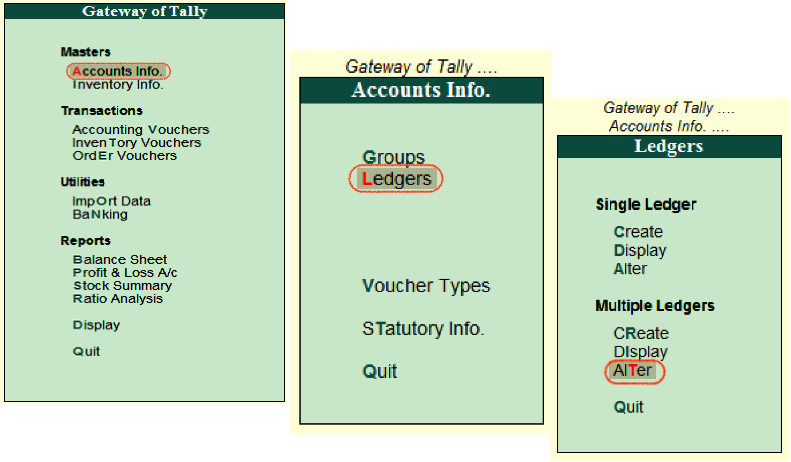
Path: Gateway of Tally –> Accounts Info –> Ledgers –> Multiple Ledgers –> Choose Alter
From the list of the groups, choose the required group name for alteration.
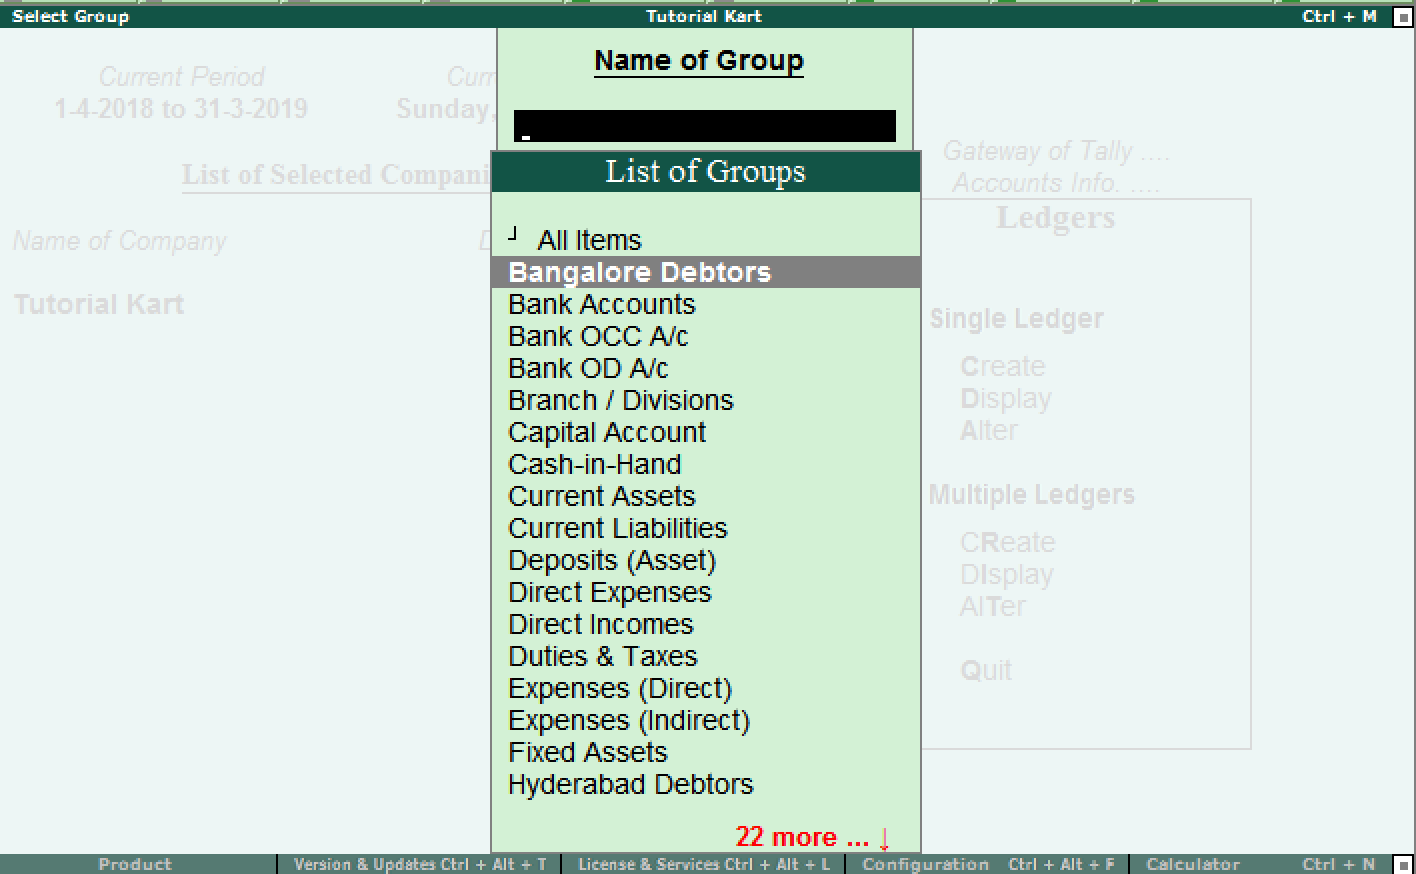
On multi ledger alteration screen, you can update the following details
- Add or delete the ledgers
- Opening Balance – Dr/Cr
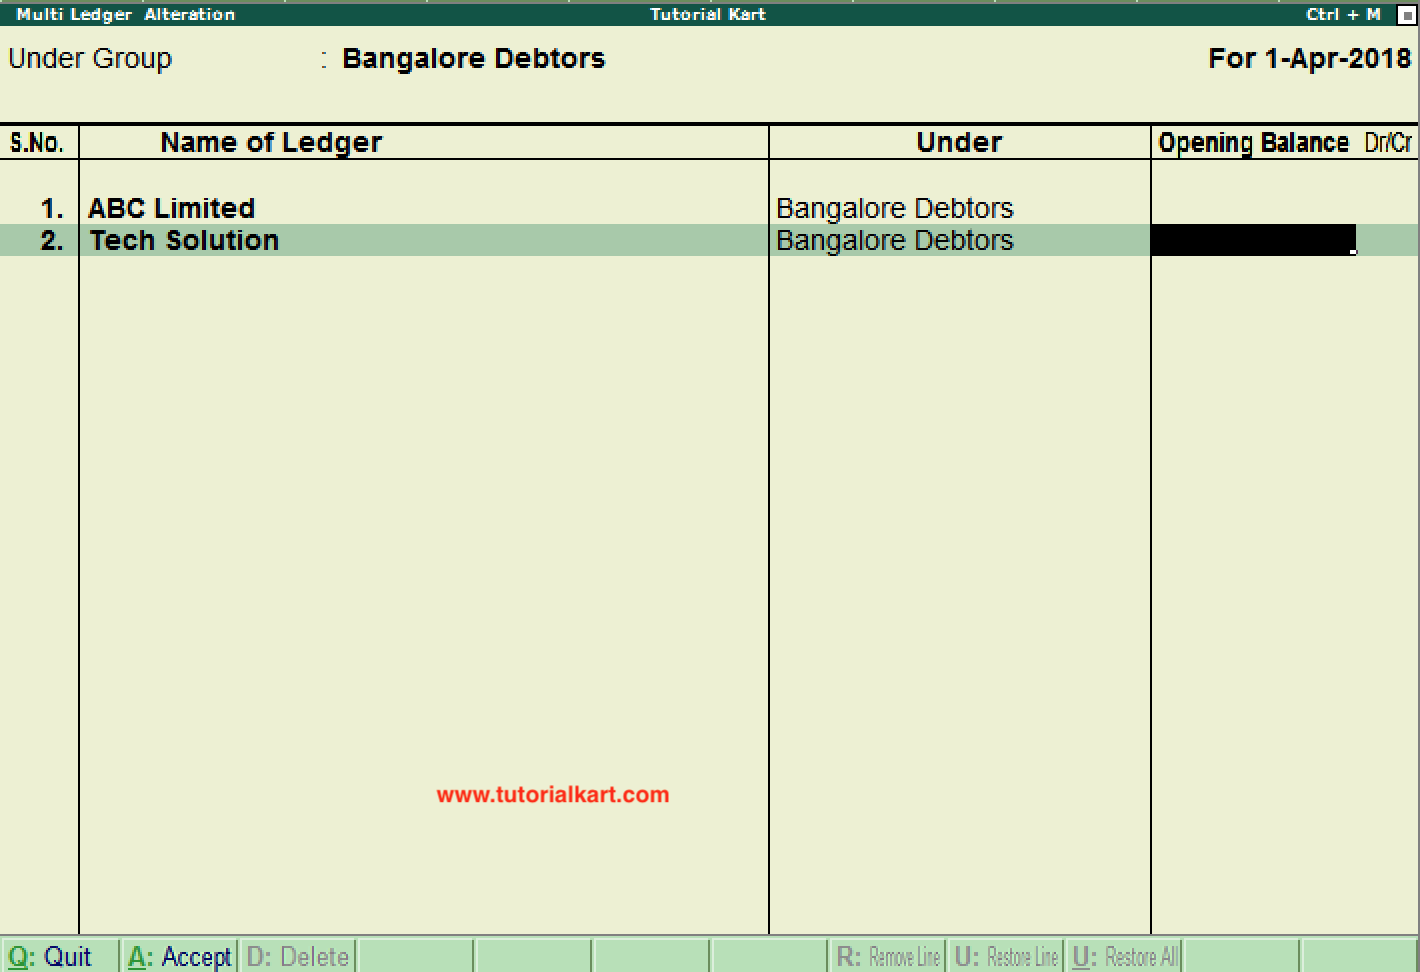
Press enter and Accept the details to save in Tally.
How to Create, Display & Alter Cost Centre in Tally (Single Cost Centre)
Cost centre in Tally
In this Tally Tutorial, we shall learn how to create, display and alter cost centre in Tally ERP 9 step by step.
Enable Cost Centre in Tally
Before creation of cost centre in tally, make the following configuration settings to enable cost centre in Tally.ERP 9. By enabling cost centres in accounting features helps you to create cost centres under account info.
Step 1: Go to Gateway of Tally > F11: Features > click on F1: Account Features.
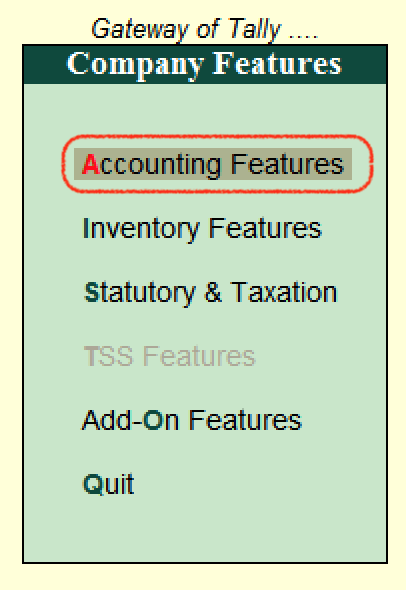
Step 2: In the next screen, enable the option for Maintain Cost Centres as “Yes”
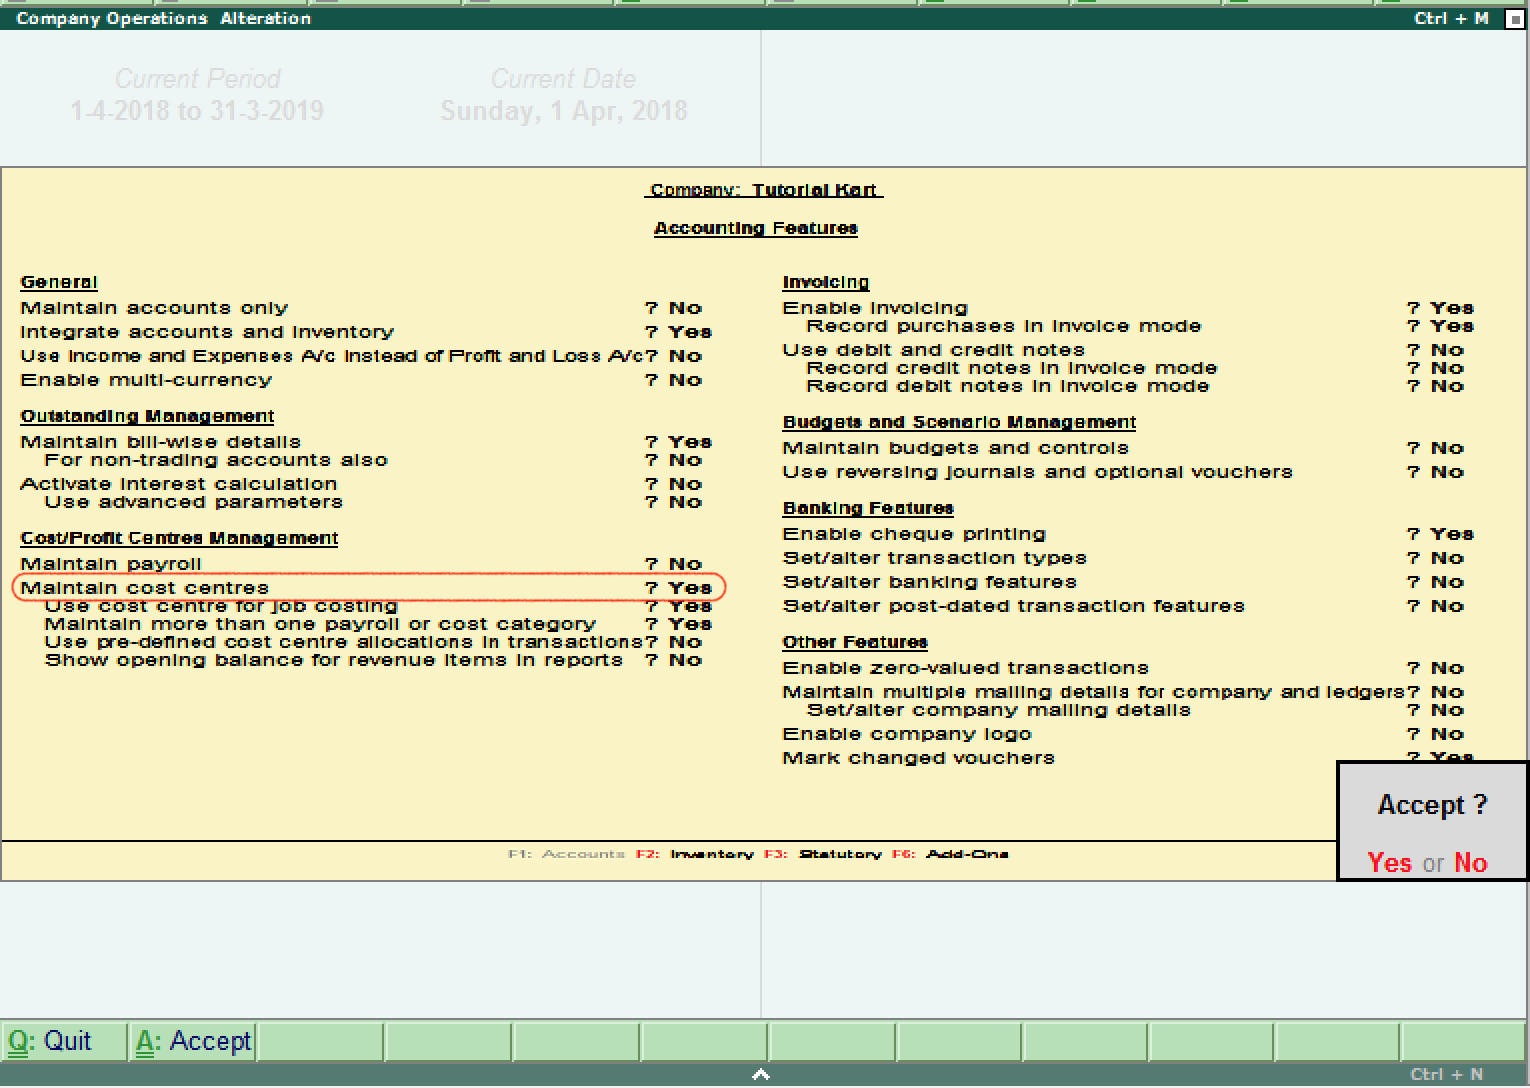
Click A:Accept to save the changed details in Tally.ERP 9.
How to create cost centre in Tally
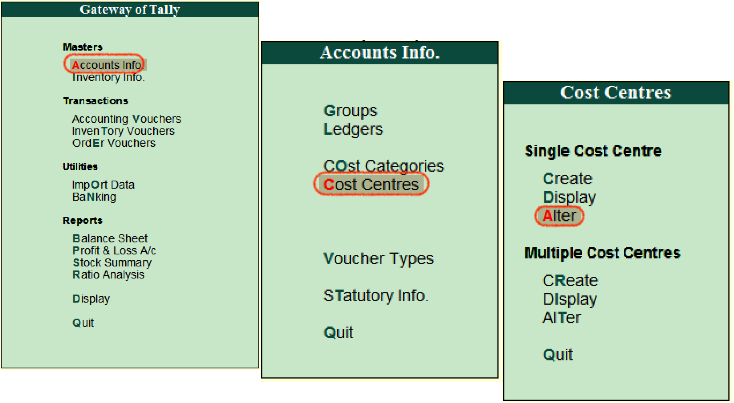
Path: Gateway of Tally –> Accounts Info –> Cost Centres.
Step 1: Go to Gateway of Tally and click on Accounts Info.

Step 2: Now click on the option “Cost Centres”
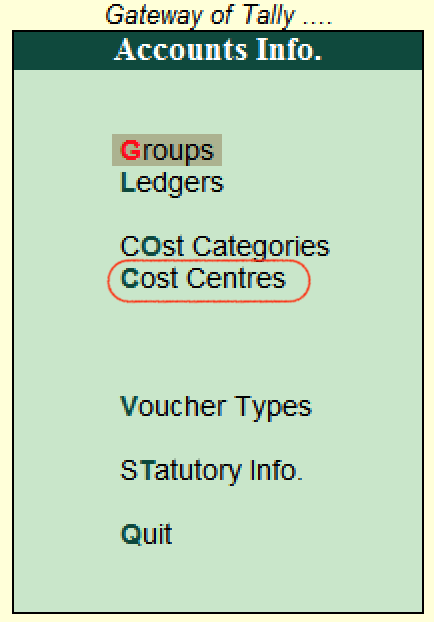
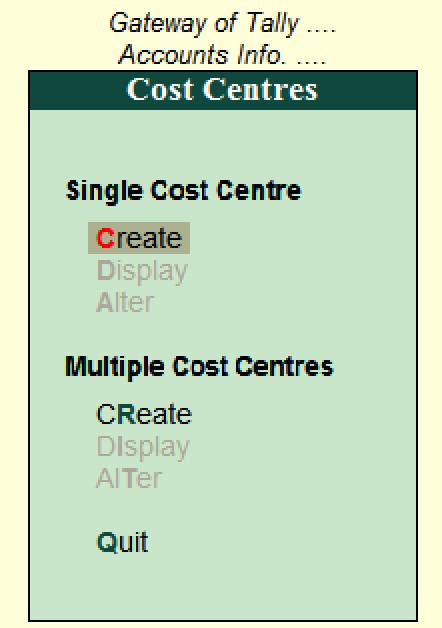
Step 3: In the next screen, under single cost centre option click on the option create.
Note: If you want to create multiple cost centres in Tally, choose the option create under multiple cost centres.
Step 4: On cost centre creation screen, update the following details
- Category: Tally automatically create primary cost centre where all the cost centres are to be assigned. Primary cost centre is a default cost centre until we create new one. Choose the category as Primary Cost Centre.
- Name: Enter the name of cost centre.
- Alias: You can can call the cost centre with other name, for e.g. Head Office, Branch, etc.
- Under: Update the parent cost centre for this cost centre from the list of cost centres.
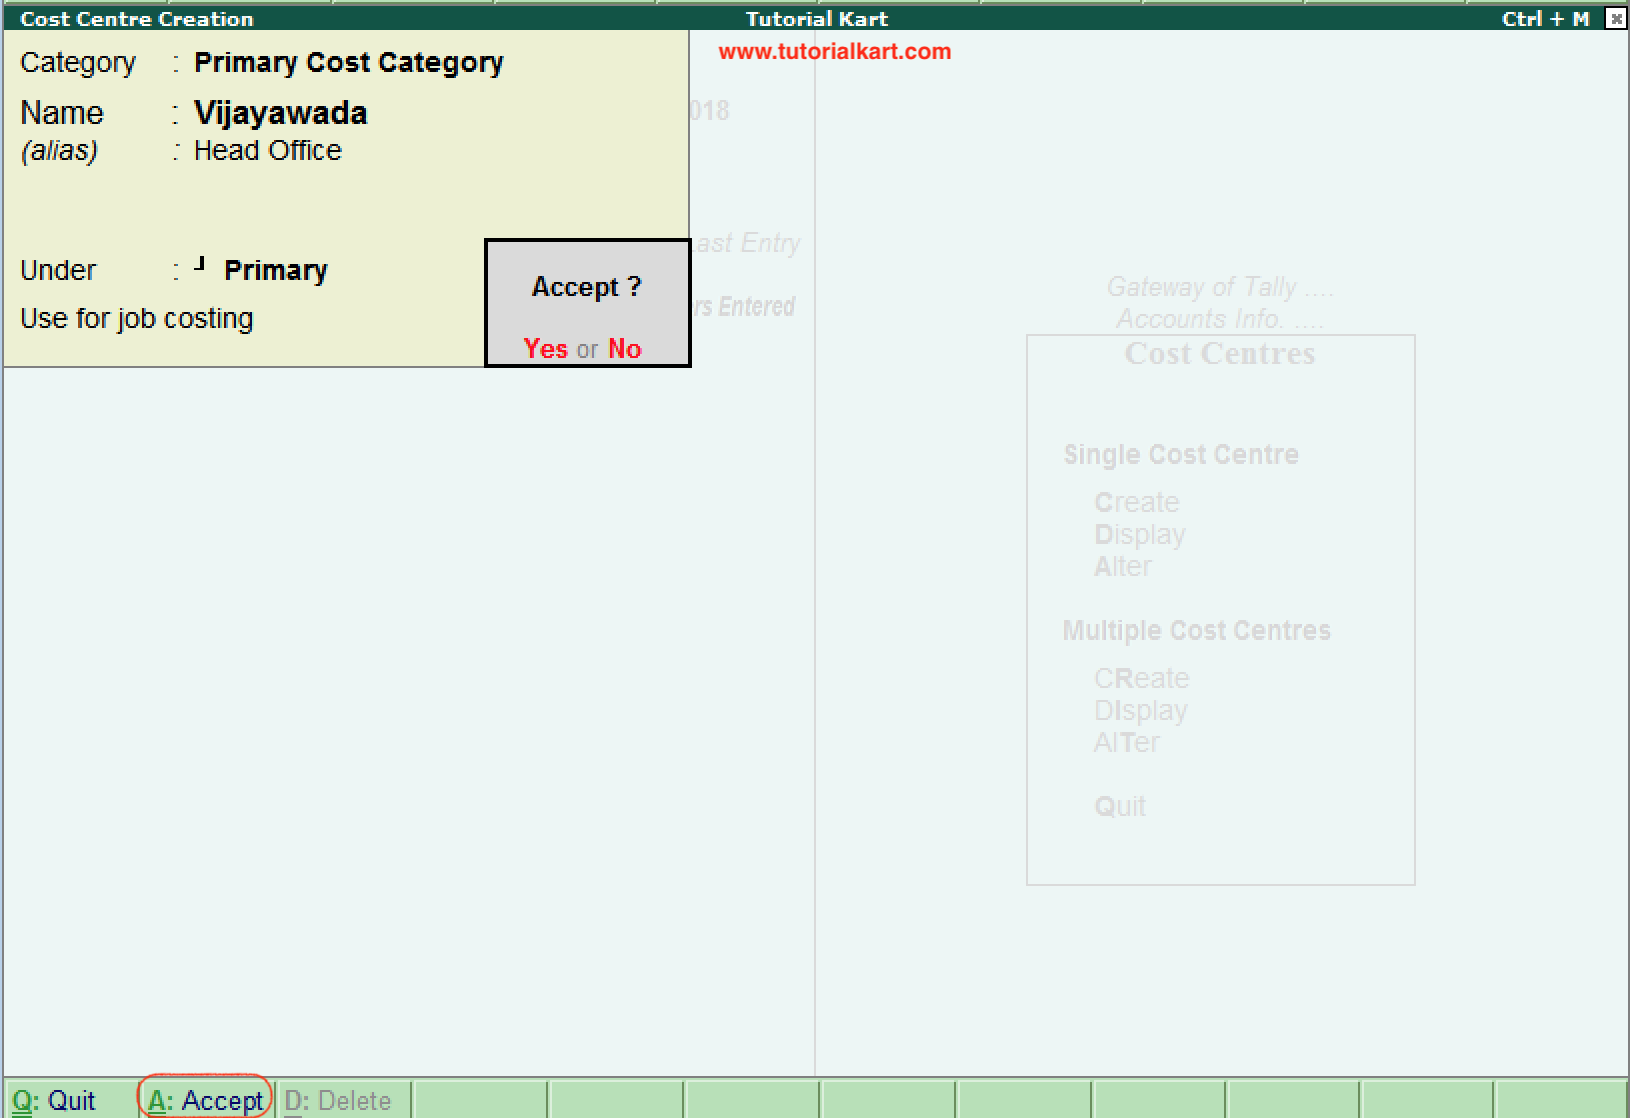
After entering the required details for cost centre creation, choose A:Accept to save the details.
How to display Single Cost Centre in Tally
Path: Gateway of Tally –> Accounts Info –> Cost Centres –> Single Cost Centre -> Display
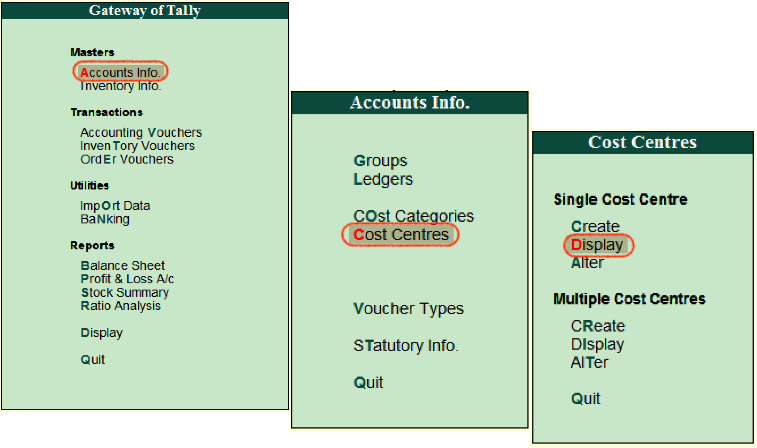
On select the cost centre screen, choose the cost centre from the list of cost centres.
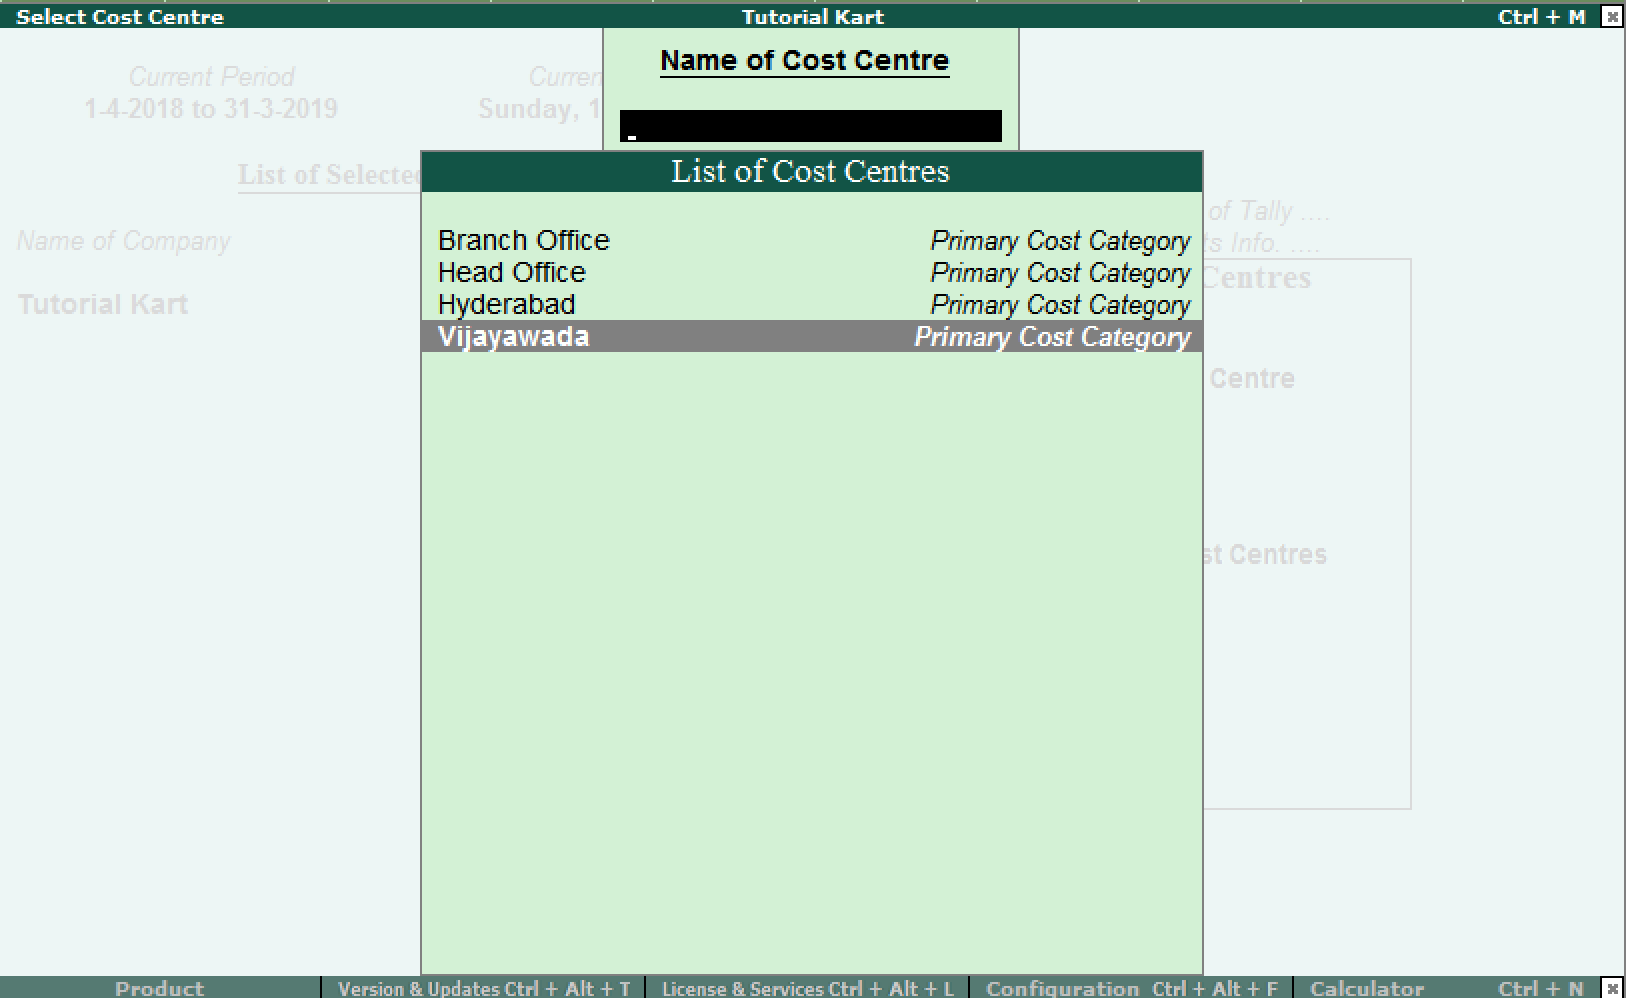
Now the cost centre displays on screen with details.
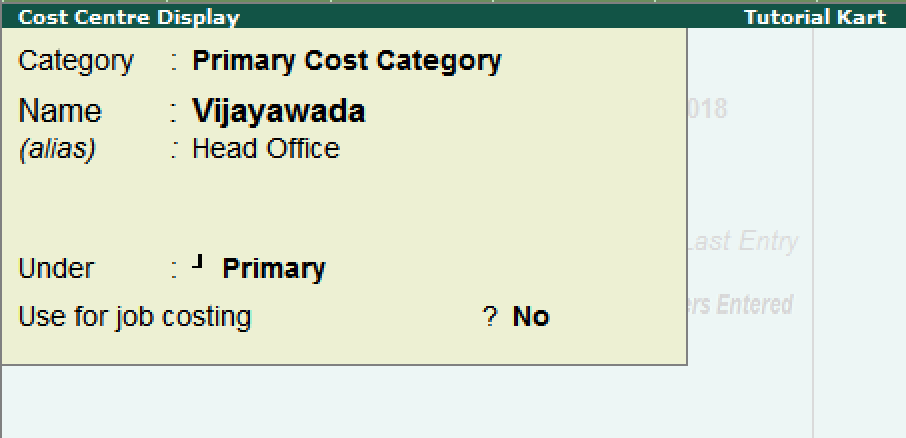
On display mode, users are not allowed to modify the details of cost centre. Only Alter mode enables to change cost centre details.
How to Alter Single Cost Centre in Tally.ERP 9
Path: Gateway of Tally –> Accounts Info –> Cost Centres –> Single Cost Centre -> Alter
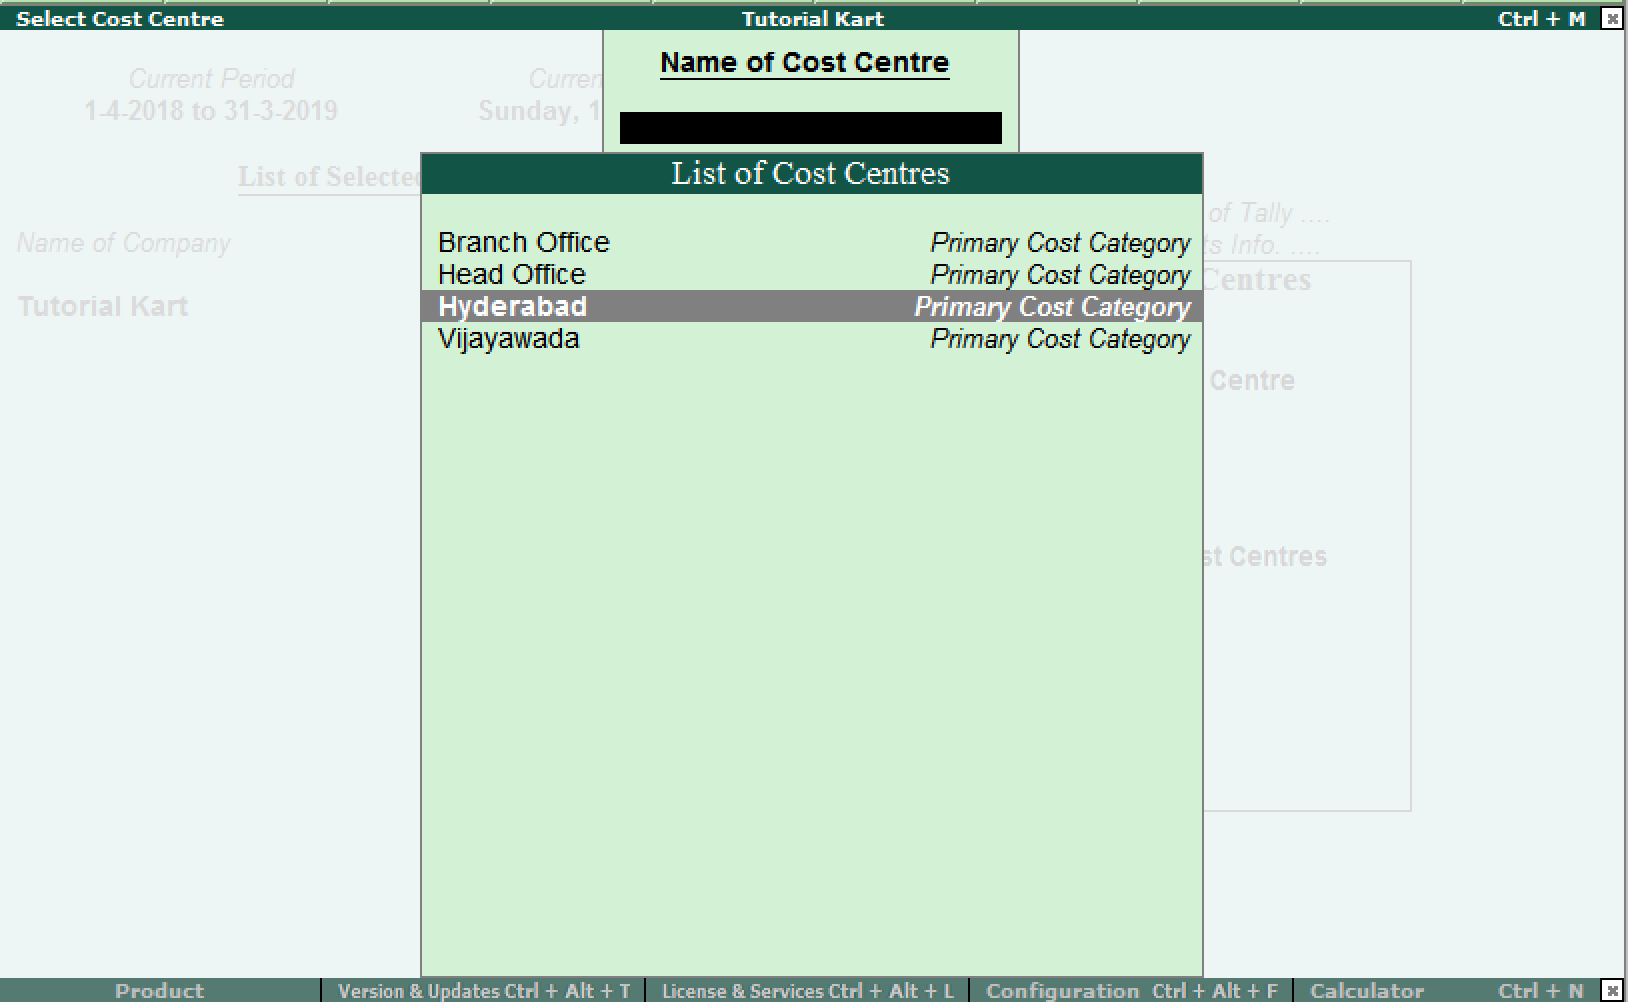
On select cost centre screen, choose the cost centre from the list of cost centres to edit the details.
On cost centre alteration screen, edit the details and choose A:Accept to save the updated details in Tally.ERP 9 application.

